


Delta Island • Super Nintendo / Super Famicom
SNES OVERRIDE
Your console. Your region. Your rules.
Rediscover the joy of playing on a multi-region Super Nintendo, with control straight from your controller and on-screen confirmation. One board brings together the essential features, without adding multiple modules or visible switches to the console shell.
SuperCIC50/60 HzAUTOD4 PatchIGROSDP1 controller controlSwitchless RESETOptional LEDSettings memoryRegion Pass-ThroughFXPak Pro / SD2SNES
Your Super Nintendo, ready for a new experience
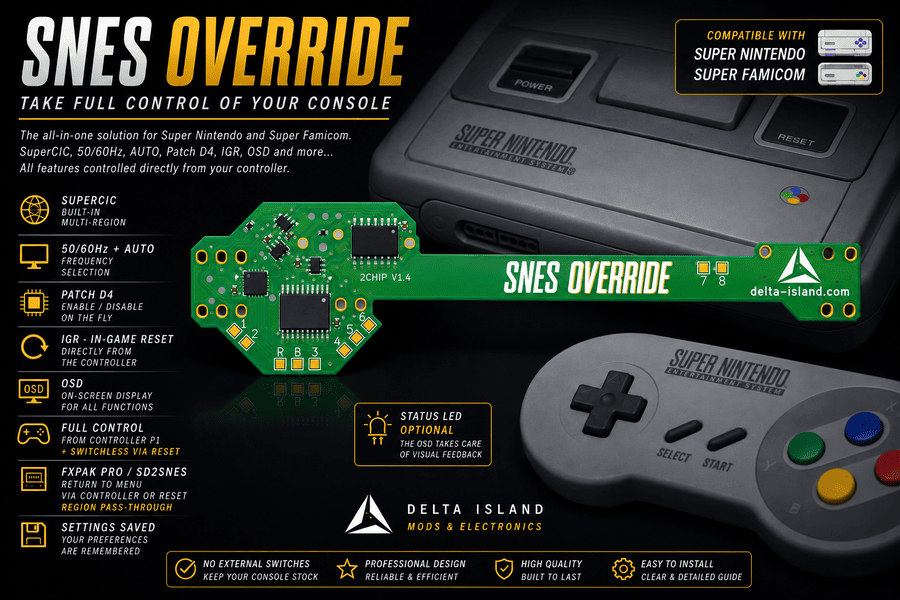
Discover SNES OVERRIDE, an all-in-one solution for the

Super Nintendo / Super Famicom.
SNES OVERRIDE brings the main modern SNES modifications together on a single board:
- SuperCIC and multi-region unlocking
- 50 Hz / 60 Hz / AUTO mode
- D4 Patch
- IGR - In-Game Reset
- OSD - On Screen Display
- Control from the Player 1 controller
- Switchless operation using the RESET button
- Optional status LED
- Settings memory
- FXPak Pro / SD2SNES Region Pass-Through
- Return to the FXPak Pro / SD2SNES menu using the controller or RESET
The goal: a modern, multi-region Super Nintendo without adding multiple modules, switches or visible modifications to the shell.
Thanks to the OSD, even the status LED is optional: essential information is displayed directly on screen.
Now available in the Delta Store:
OSD - On Screen Display
SNES OVERRIDE status, directly on screen
The OSD is the main interface for SNES OVERRIDE.
Whenever you issue a command using the controller or the console, the selected mode is immediately displayed on screen:
- 50 Hz
- 60 Hz
- AUTO
- D4 Patch ON / OFF
- Region Pass-Through
No need to remember an LED color or a switch position: the console confirms your command directly on screen.
Controller and RESET button control
Full control of your switchless modification
The Player 1 controller lets you operate the main SNES OVERRIDE features using button combinations:
- Select 50 Hz
- Select 60 Hz
- Mode AUTO
- Region Pass-Through
- D4 Patch ON / OFF
- In-Game Reset
- Return to the FXPak Pro / SD2SNES menu
Commands require a deliberate hold to prevent accidental activation during gameplay.
The familiar switchless operation using the RESET button is also retained. Users familiar with SuperCIC can continue using the console’s physical RESET button to change modes.
SNES OVERRIDE can therefore be controlled:
- From the Player 1 controller
- From the RESET button
- With confirmation through the OSD
- With an Optional status LED
SuperCIC - 50 Hz / 60 Hz / AUTO
A truly multi-region Super Nintendo
SuperCIC is built directly into SNES OVERRIDE to handle Super Nintendo region unlocking and the use of PAL or NTSC games.
Three main modes are available:
50 Hz
Keeps PAL operation when required.
60 Hz
Enables NTSC operation and restores the original speed of games designed for 60 Hz.
AUTO
SNES OVERRIDE detects the region through the cartridge’s CIC Key and automatically adjusts the console’s operation.
Insert your game and turn on the console: SNES OVERRIDE takes care of the rest.
Three main modes are available:
50 Hz
Keeps PAL operation when required.
60 Hz
Enables NTSC operation and restores the original speed of games designed for 60 Hz.
AUTO
SNES OVERRIDE detects the region through the cartridge’s CIC Key and automatically adjusts the console’s operation.
Insert your game and turn on the console: SNES OVERRIDE takes care of the rest.
D4 Patch
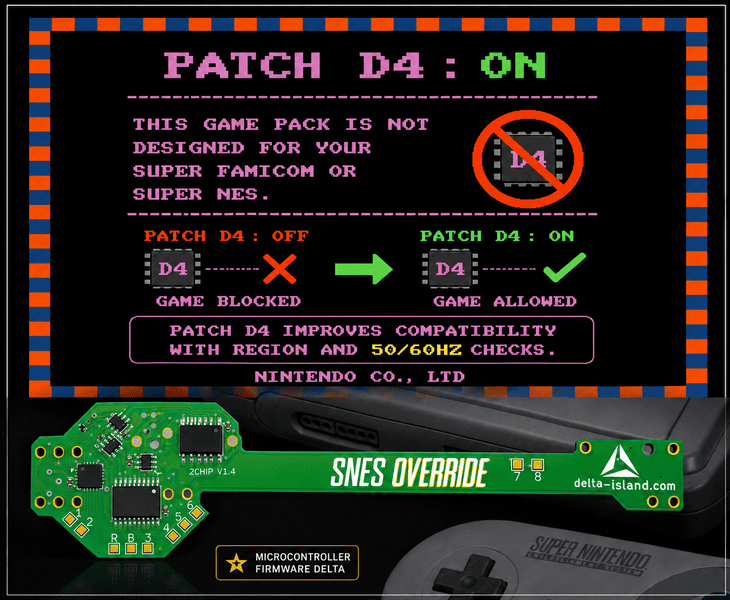
Some Super Nintendo games check the console’s region or operating frequency.
SNES OVERRIDE therefore includes support for the D4 Patch to improve compatibility with these titles.
The D4 Patch can be enabled or disabled from the controller, and its status is immediately confirmed by the OSD:
D4 PATCH: ON
or
D4 PATCH: OFF
Its state is saved and automatically restored the next time you turn on the console.
SNES OVERRIDE therefore includes support for the D4 Patch to improve compatibility with these titles.
The D4 Patch can be enabled or disabled from the controller, and its status is immediately confirmed by the OSD:
D4 PATCH: ON
or
D4 PATCH: OFF
Its state is saved and automatically restored the next time you turn on the console.
IGR - In-Game Reset
In-Game Reset lets you restart the Super Nintendo directly from the Player 1 controller using a button combination.
This feature saves you from having to press the physical RESET button and is particularly convenient when using flashcarts.
This feature saves you from having to press the physical RESET button and is particularly convenient when using flashcarts.
FXPak Pro / SD2SNES
Integration designed for modern SNES flashcarts
SNES OVERRIDE was designed to work directly with the FXPak Pro / SD2SNES.
Region Pass-Through
This mode lets SNES OVERRIDE follow the region information sent by the FXPak Pro / SD2SNES whenever its operation requires it, while retaining the benefits of SuperCIC.
Region Pass-Through
This mode lets SNES OVERRIDE follow the region information sent by the FXPak Pro / SD2SNES whenever its operation requires it, while retaining the benefits of SuperCIC.
Return to the FXPak Pro / SD2SNES menu
You can return directly to the flashcart menu:
You can return directly to the flashcart menu:
- From the Player 1 controller
- From the RESET button
Finish your game, enter the command and return directly to the FXPak Pro / SD2SNES menu without turning off the console.
Optional status LED
SNES OVERRIDE can drive a status LED just like a traditional SuperCIC switchless installation.
However, thanks to the OSD, installing it is no longer necessary.
Want to keep the traditional light indicator?
Install the LED.
Want to keep the console’s exterior completely original?
Leave it out.
SNES OVERRIDE works perfectly in either configuration.
However, thanks to the OSD, installing it is no longer necessary.
Want to keep the traditional light indicator?
Install the LED.
Want to keep the console’s exterior completely original?
Leave it out.
SNES OVERRIDE works perfectly in either configuration.
Settings memory
SNES OVERRIDE has internal memory that retains the main settings after the console is switched off.
Your selected settings are automatically restored at the next startup.
Configure your Super Nintendo once: SNES OVERRIDE remembers.
Your selected settings are automatically restored at the next startup.
Configure your Super Nintendo once: SNES OVERRIDE remembers.
An all-in-one system for Super Nintendo
SNES OVERRIDE replaces the collection of separate modifications traditionally installed in a Super Nintendo.
Its microcontroller and Delta firmware work together to manage:
SuperCIC • Multi-region • 50/60 Hz • AUTO • D4 Patch • IGR • OSD • Player 1 controller • Switchless RESET • Optional LED • FXPak Pro / SD2SNES • Settings memory
All features communicate within a single system instead of operating as separate mods.
Its microcontroller and Delta firmware work together to manage:
SuperCIC • Multi-region • 50/60 Hz • AUTO • D4 Patch • IGR • OSD • Player 1 controller • Switchless RESET • Optional LED • FXPak Pro / SD2SNES • Settings memory
All features communicate within a single system instead of operating as separate mods.
Invisible on the outside.
A complete system on the inside.
A complete system on the inside.
Insert your game.
Pick up your controller.
Make your choice.
SNES OVERRIDE takes care of the rest.
Pick up your controller.
Make your choice.
SNES OVERRIDE takes care of the rest.
SNES OVERRIDE
Your console. Your region. Your rules.
Required equipment
Before installing SNES OVERRIDE, make sure you have the following equipment:
- 1 × SNES OVERRIDE, available in the Delta Store >>
- 1 × 3 mm red/blue common-anode bi-color LED supplied with SNES OVERRIDE — optional installation
- Fine 30 AWG wire or smaller
- Soldering iron with a fine tip
- Electronics solder
- Soldering flux
- Desoldering braid or a desoldering pump
- Scalpel, thin blade or precision tool to lift the CIC and PPU pins
- Fine needle-nose pliers
- Flush cutters
- 4.5 mm Security Bit / Gamebit screwdriver to open the console
- Phillips screwdriver
- Isopropyl alcohol (IPA) and a brush to clean flux residue
- Multimeter to check continuity and verify that there are no short circuits
- Magnifying glass or microscope strongly recommended for inspecting CIC and PPU pins and the various solder joints
Installing SNES OVERRIDE involves several operations on surface-mount components with fine pins. Using a suitable soldering iron, flux and magnification is strongly recommended to reduce the risk of damaging the motherboard.
Installation guide
🔒 Important safety instructions
⚠️ Disconnect all power before working
• Completely unplug the console and its power supply.
• Work on a clean, stable and well-lit surface.
• Use a suitable soldering iron, flux and a fine tip.
• Always inspect your traces and solder joints under magnification before reassembly.
• Work on a clean, stable and well-lit surface.
• Use a suitable soldering iron, flux and a fine tip.
• Always inspect your traces and solder joints under magnification before reassembly.
1. Disassembling your SNES Super Nintendo / Super Famicom
Watch the following videos for step-by-step guidance on opening and disassembling your console.
Remember to have a 4.5 mm Security Bit (Gamebit) screwdriver ready: it is essential for removing the security screws underneath the console.
Remember to have a 4.5 mm Security Bit (Gamebit) screwdriver ready: it is essential for removing the security screws underneath the console.
Super Nintendo / Super Famicom disassembly videos
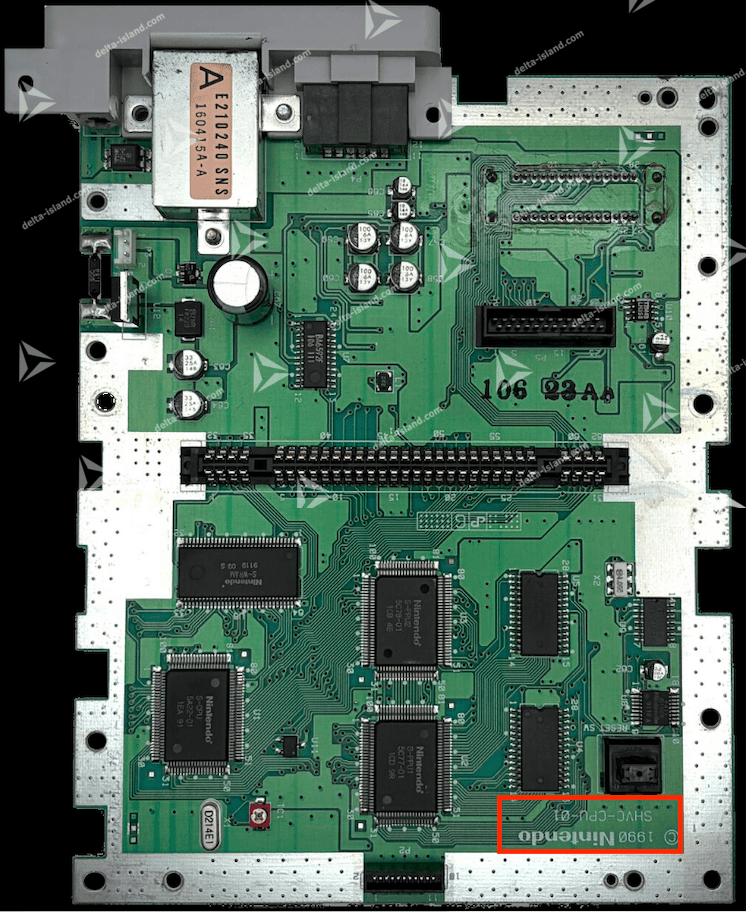
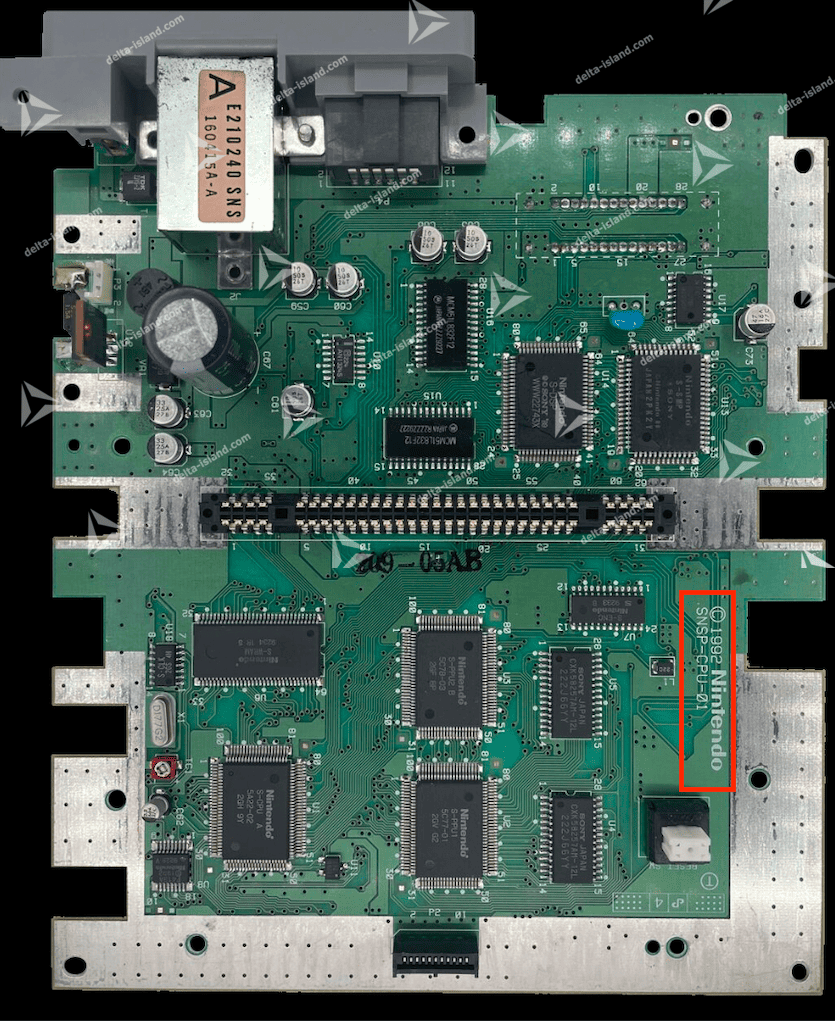
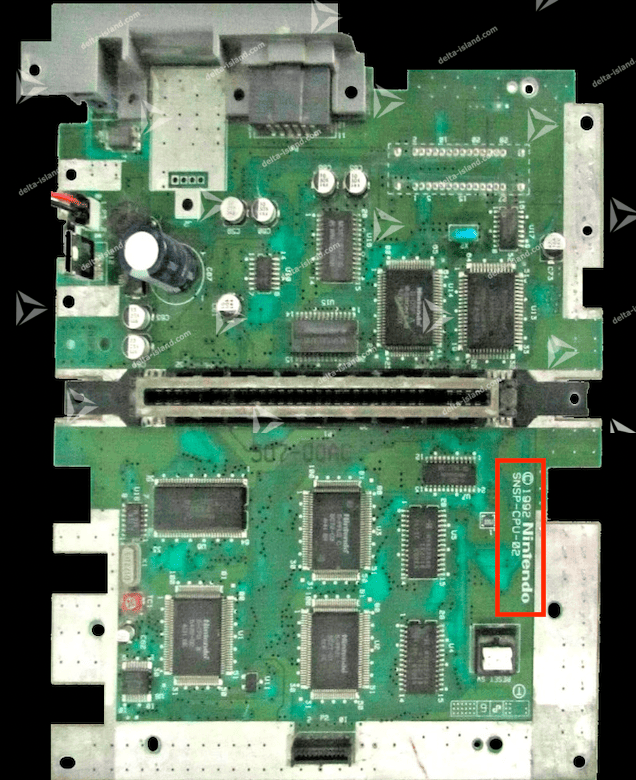
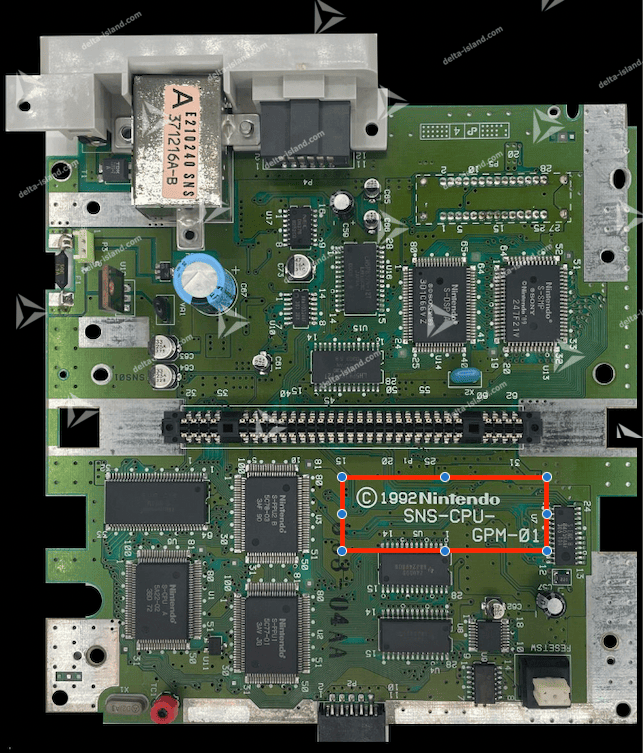
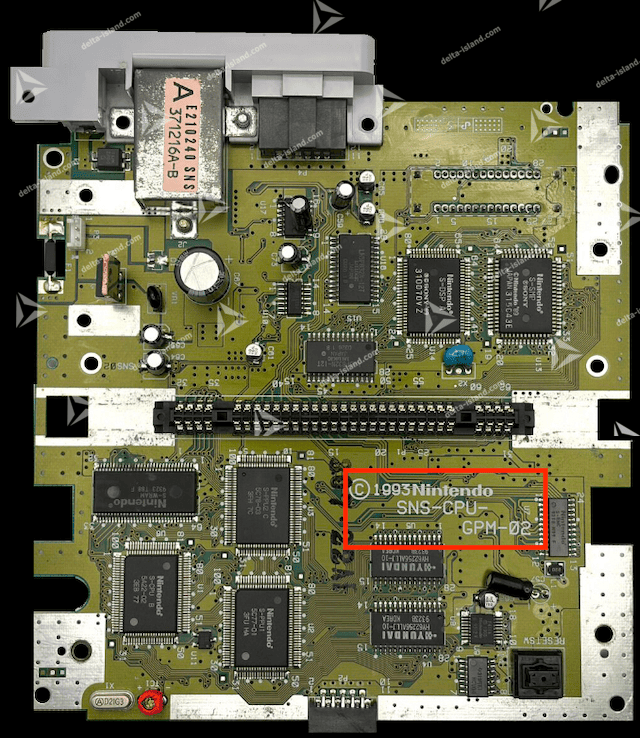
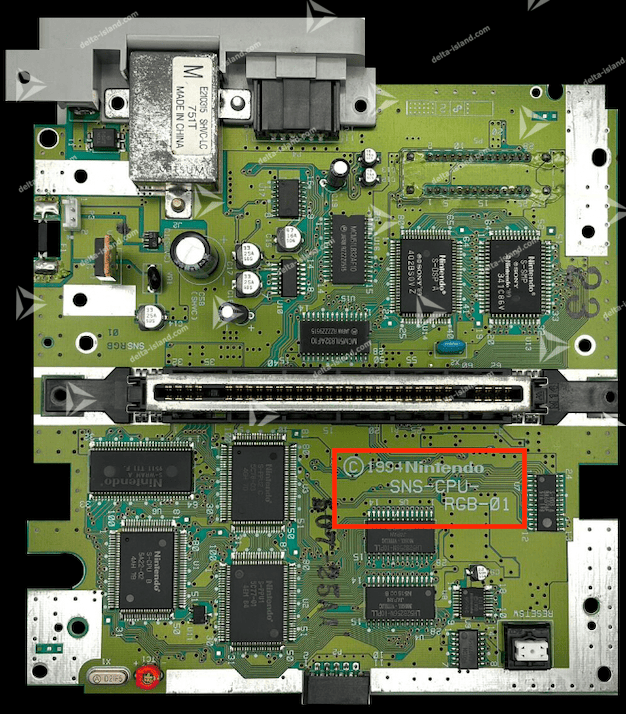
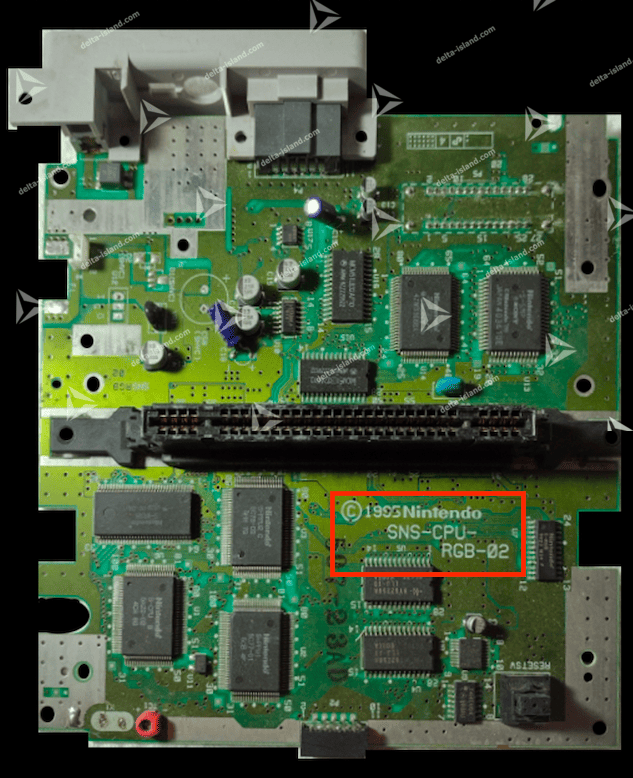
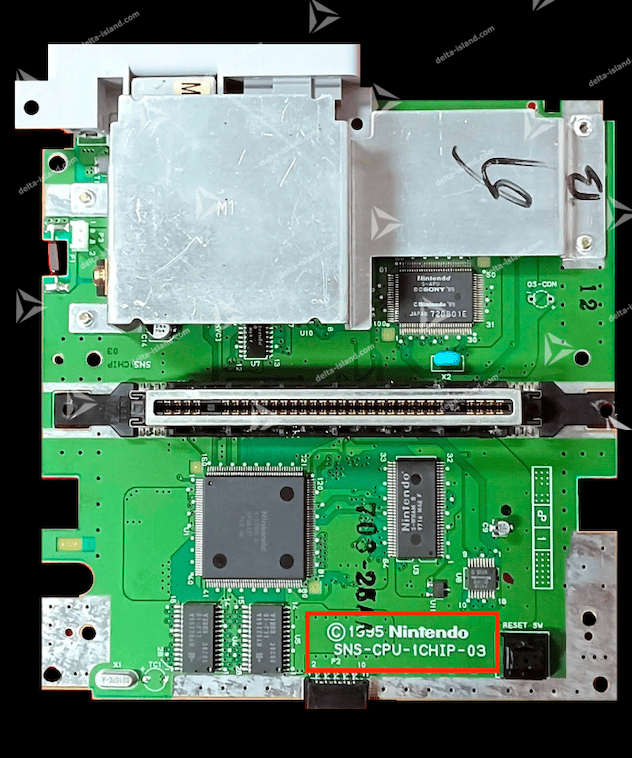
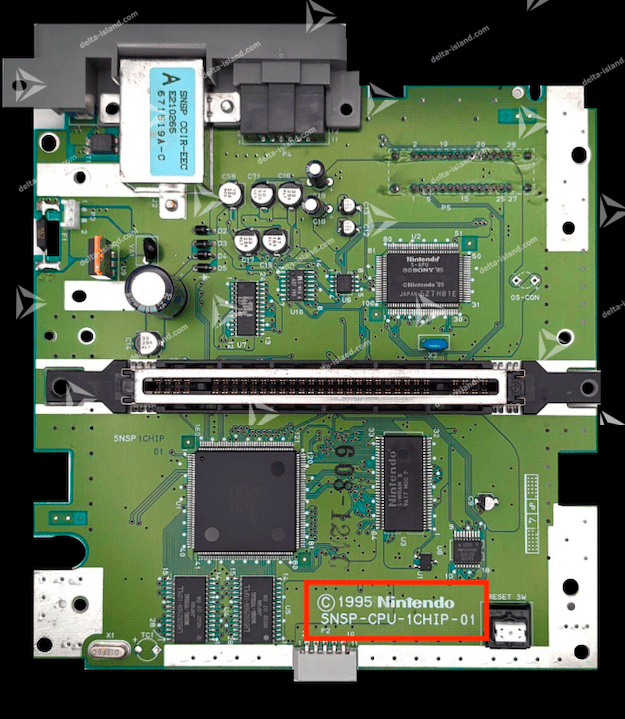
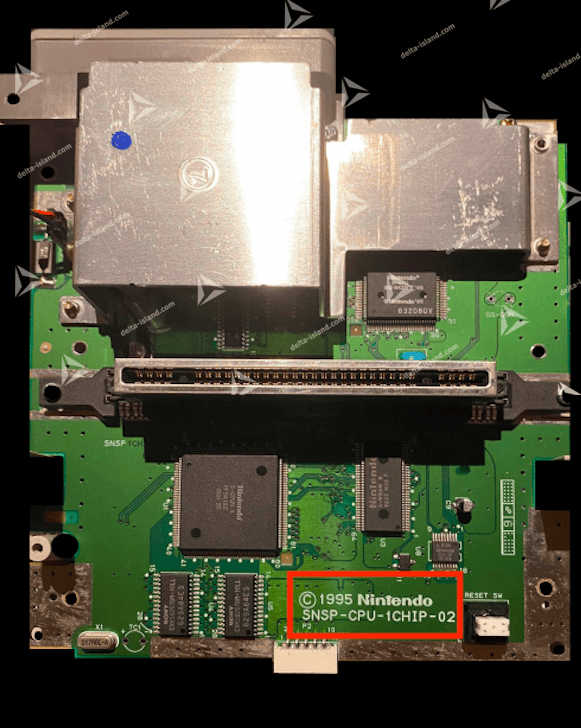
2. Identifying your SNES Super Nintendo / Super Famicom motherboard
Identify your motherboard using the following photos:
SHVC-CPU-01
Super Famicom - NTSC
SNSP-CPU-01
Super Nintendo - PAL
SNSP-CPU-02
Super Nintendo - PAL
SNS-CPU-GPM-01
Super Nintendo / Famicom - NTSC
SNS-CPU-GPM-02
Super Nintendo / Famicom - NTSC
SNS-CPU-RGB-01
Super Nintendo / Famicom - NTSC
SNS-CPU-RGB-02
Super Nintendo / Famicom - NTSC
SNS-CPU-APU-01
Super Nintendo / Famicom - NTSC

SNS-CPU-1CHIP-01
Super Nintendo / Famicom - NTSC

SNS-CPU-1CHIP-02
Super Nintendo / Famicom - NTSC

SNS-CPU-1CHIP-03
Super Nintendo / Famicom - NTSC
SNSP-CPU-1CHIP-01
Super Nintendo - PAL
SNSP-CPU-1CHIP-02
Super Nintendo - PAL
SNN-CPU-01
Super Nintendo / Famicom Jr - NTSC

3. Disabling the Nintendo CIC
For SNES OVERRIDE to take over the console’s region-unlocking function, the original Nintendo CIC (lockout chip) must be electrically disabled.
The CIC is located on the top side of the Super Nintendo motherboard.
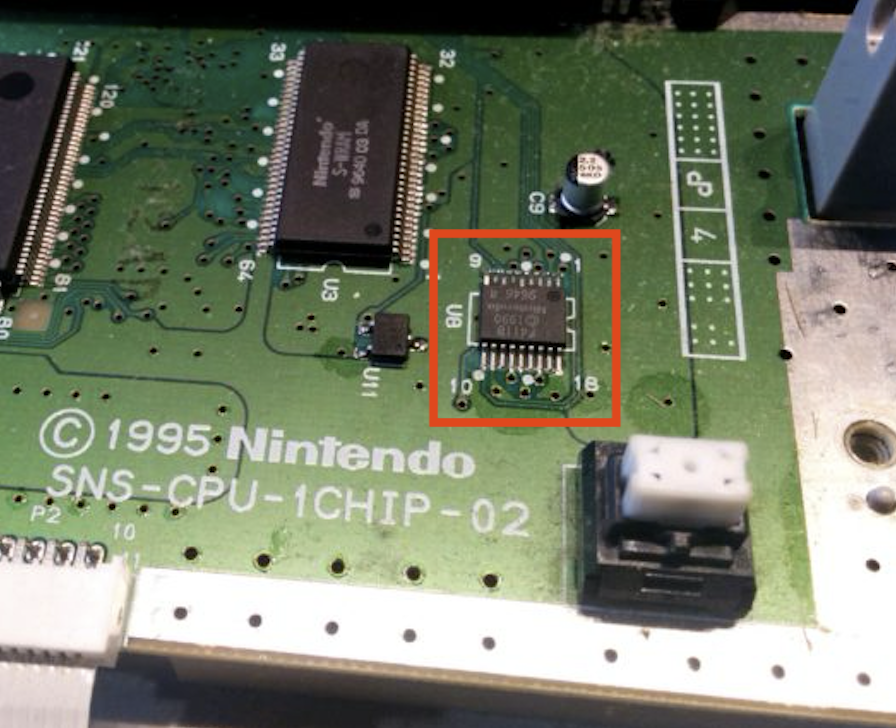
Depending on the region and revision of your console, the CIC may have one of the following part numbers:
CIC - F411A
NTSC region

CIC - F411B
NTSC region

CIC - F413A
PAL region

CIC - F413B
PAL region

3.1 Disabling the original Super Nintendo CIC
Disabling the CIC leaves the original component on the motherboard while electrically isolating the signals needed for SNES OVERRIDE to operate.
The procedure simply involves desoldering and slightly lifting certain CIC pins so that they no longer touch their pads.
This method is preferable to removing the component completely: it minimizes work on the motherboard and avoids unnecessarily exposing the CIC and nearby components to excessive heat.
The procedure simply involves desoldering and slightly lifting certain CIC pins so that they no longer touch their pads.
This method is preferable to removing the component completely: it minimizes work on the motherboard and avoids unnecessarily exposing the CIC and nearby components to excessive heat.
Start by precisely identifying the CIC pins that need to be isolated:
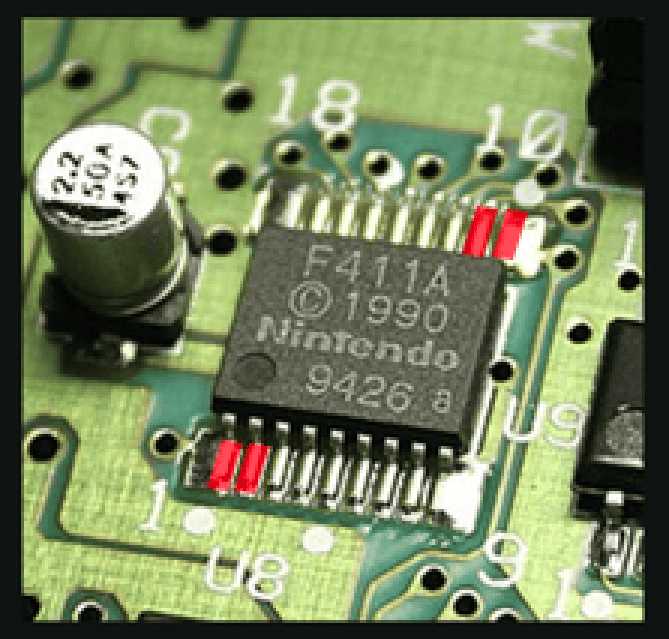
CIC pins 1, 2, 10 and 11 must be lifted.
Apply a small amount of soldering flux to the relevant pins.
Using a soldering iron with a fine tip, heat each pin individually.
Once the solder is fully molten, gently slide the tip of a scalpel or a very fine tool under the pin, then apply light upward pressure to lift it away from its pad.
Using a soldering iron with a fine tip, heat each pin individually.
Once the solder is fully molten, gently slide the tip of a scalpel or a very fine tool under the pin, then apply light upward pressure to lift it away from its pad.
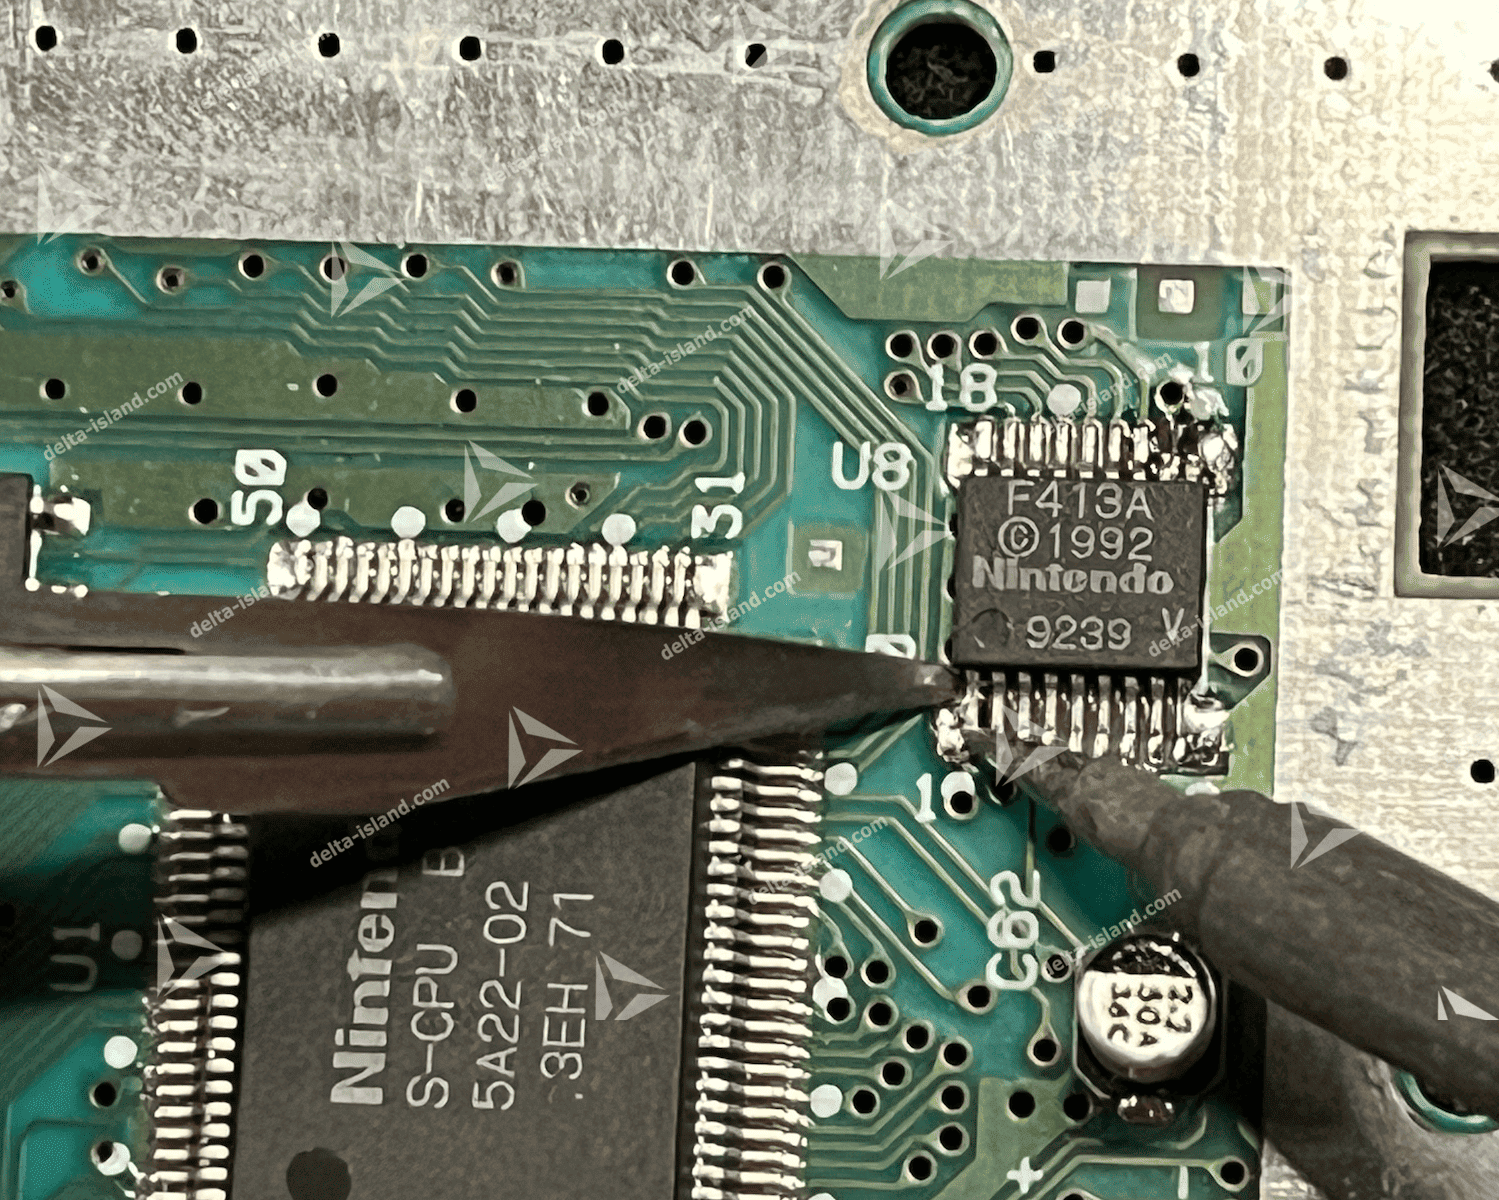
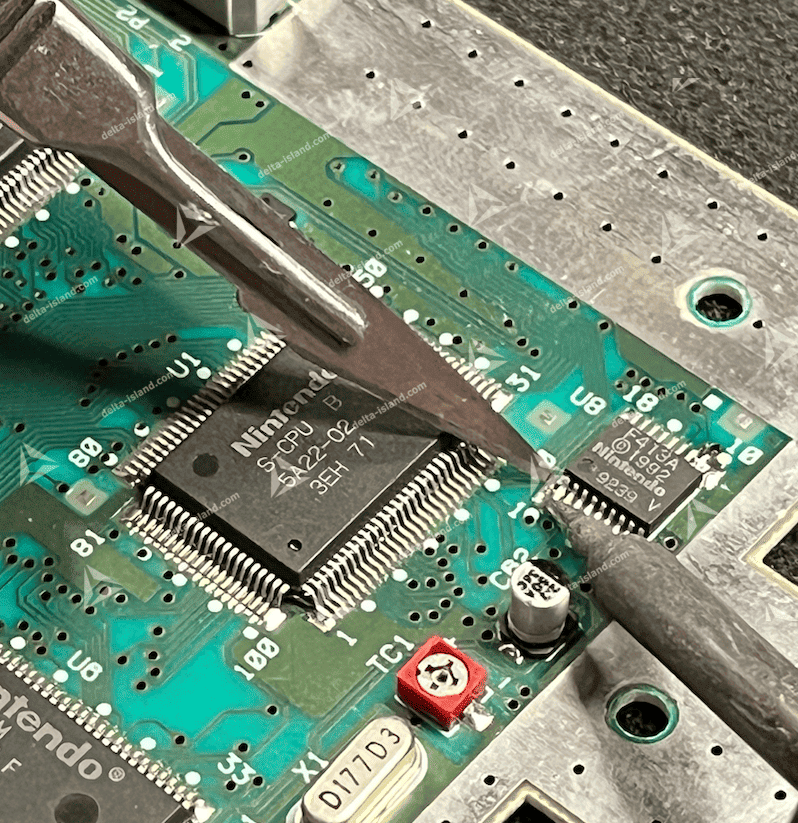
Important: never try to lift a pin until the solder is completely molten.
The CIC pins are particularly fine. Excessive force could break a pin or, worse, lift its corresponding pad off the motherboard.
Work gradually, one pin at a time.
There is no need to lift the pins very far: a few tenths of a millimeter are enough. The only goal is to eliminate electrical contact between each pin and its pad.
Work gradually, one pin at a time.
There is no need to lift the pins very far: a few tenths of a millimeter are enough. The only goal is to eliminate electrical contact between each pin and its pad.
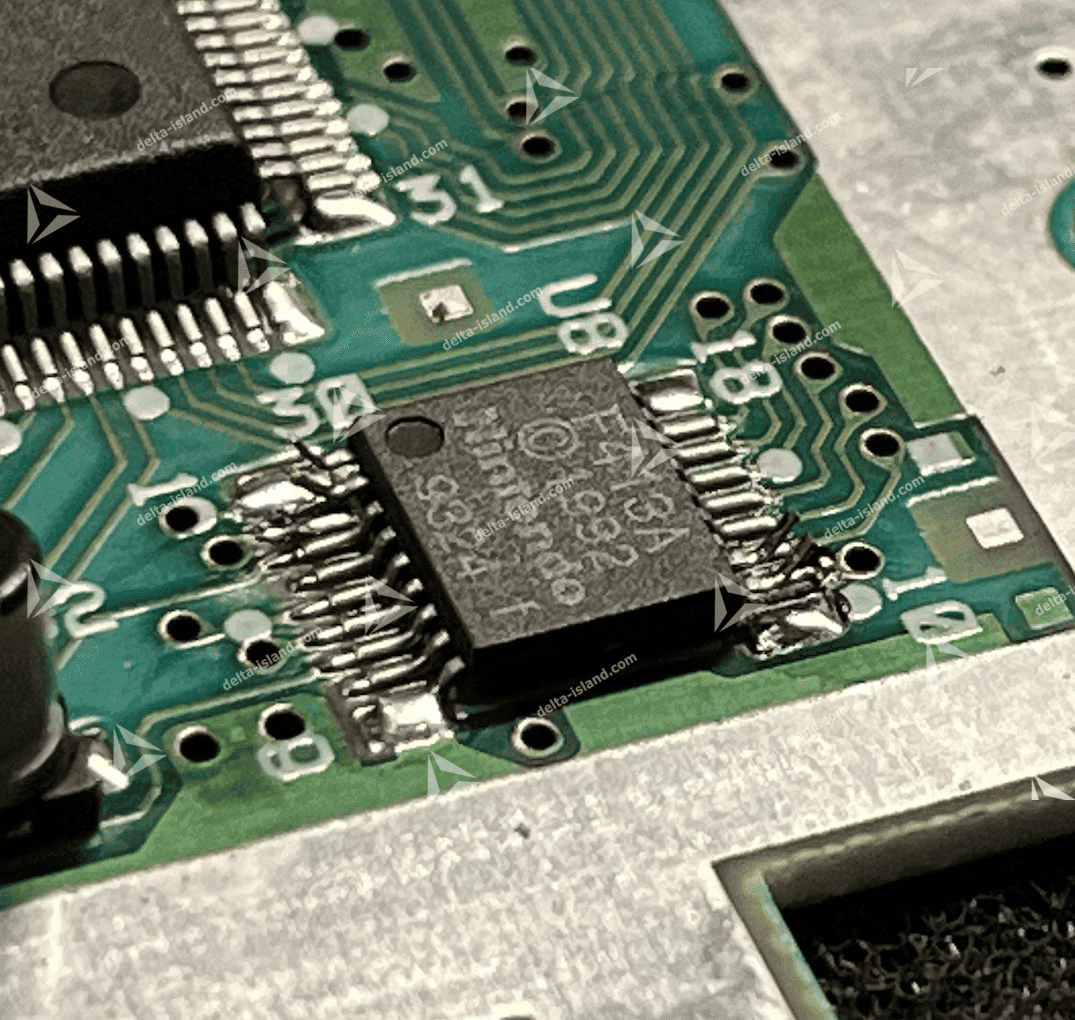
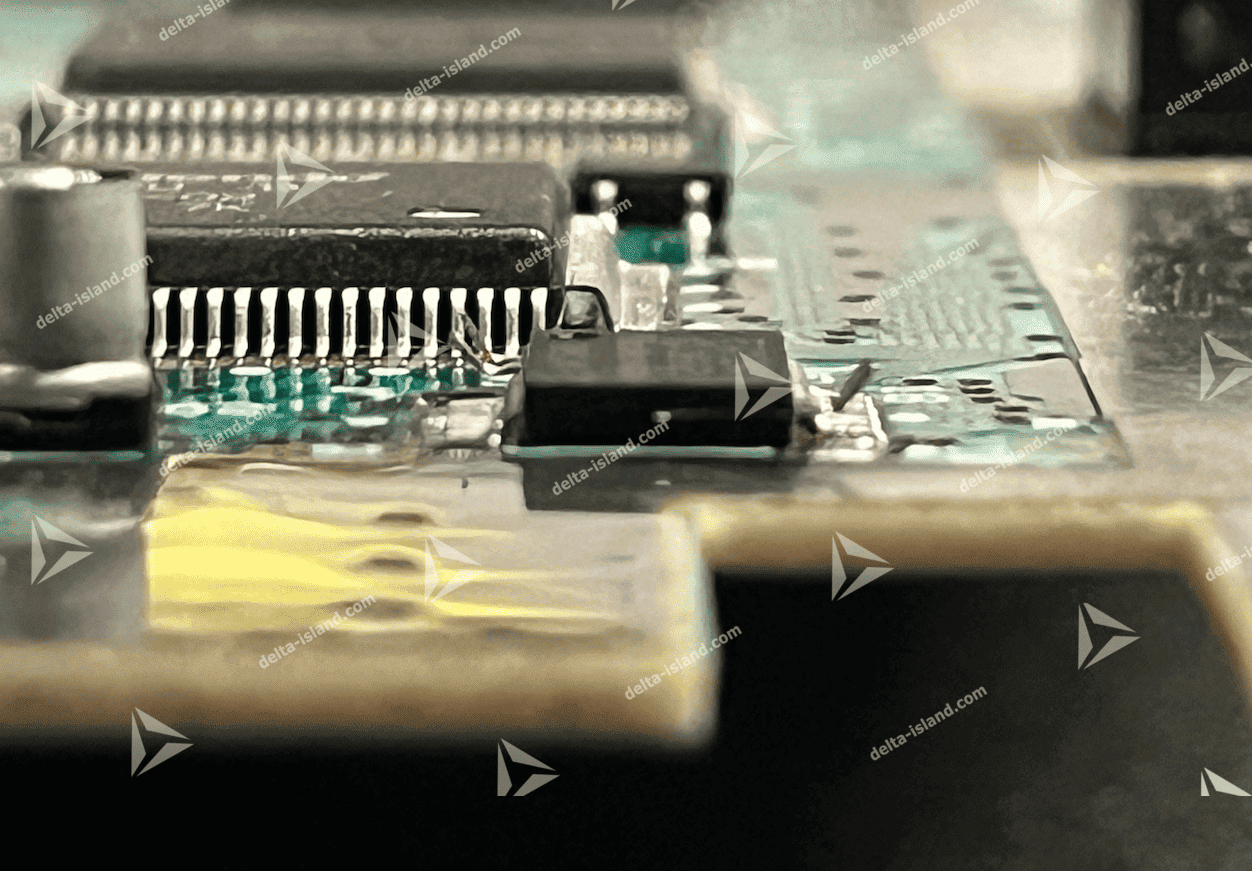
Once all four pins have been lifted, inspect your work carefully, ideally with a magnifying glass or microscope.
In particular, check that:
In particular, check that:
- pins 1, 2, 10 and 11 no longer touch their pads;
- there are no solder bridges;
- the lifted pins do not touch adjacent pins;
- no motherboard pads or traces have been damaged.
Warning: a lifted pin must never touch a neighboring pin or any other conductive part of the motherboard.
Finish by thoroughly cleaning the area with isopropyl alcohol (IPA) to remove any flux residue.
The Nintendo CIC remains physically present on the motherboard, but the necessary signals are now isolated.
The motherboard is now ready for SNES OVERRIDE installation and wiring.
Finish by thoroughly cleaning the area with isopropyl alcohol (IPA) to remove any flux residue.
The Nintendo CIC remains physically present on the motherboard, but the necessary signals are now isolated.
The motherboard is now ready for SNES OVERRIDE installation and wiring.
4.1 - Preparing PPU1 & PPU2
This step applies only to consoles with two PPUs, corresponding to the following motherboard revisions:
- SHVC-CPU-01
- SNSP-CPU-01
- SNSP-CPU-02
- SNS-CPU-GPM-01
- SNS-CPU-GPM-02
- SNS-CPU-RGB-01
- SNS-CPU-RGB-02
- SNS-CPU-APU-01
If your motherboard is not listed here, refer to section 4.2 for 1CHIP consoles, then proceed to section 5.
To switch the console between 50 Hz and 60 Hz, SNES OVERRIDE must take control of the frequency-selection pins on both Super Nintendo / Super Famicom (SNES / SFC) PPUs.
As with disabling the CIC, the relevant pins must be carefully lifted away from the motherboard using a soldering iron and a scalpel or very thin blade.
4.1.1 - Preparing PPU1
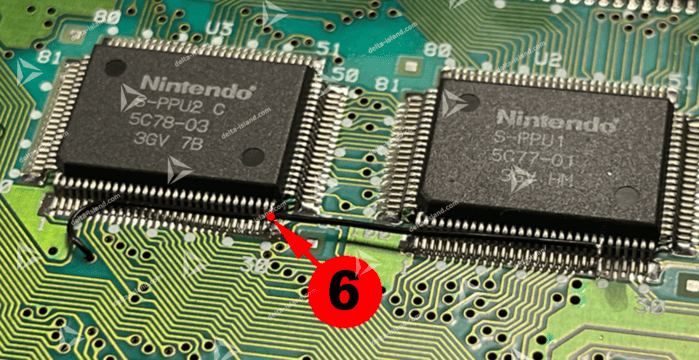
First, locate the PPU1 on the motherboard. The component is marked S-PPU1.
Then identify pin 24 of the S-PPU1.
Using your soldering iron, gently heat pin 24 while sliding the tip of a scalpel or thin blade underneath it.
Gently lift the pin to isolate it completely from its pad on the motherboard.
Never force the pin: it is fragile and can break easily.
Then identify pin 24 of the S-PPU1.
Using your soldering iron, gently heat pin 24 while sliding the tip of a scalpel or thin blade underneath it.
Gently lift the pin to isolate it completely from its pad on the motherboard.
Never force the pin: it is fragile and can break easily.

4.1.2 - Preparing PPU2
Now locate the PPU2 on the motherboard. The component is usually marked S-PPU2.
Identify pin 30 of the S-PPU2.
As before, gently heat the pin with your soldering iron and use a scalpel or thin blade to lift it.
The pin 30 must be completely isolated from its pad on the motherboard.
Identify pin 30 of the S-PPU2.
As before, gently heat the pin with your soldering iron and use a scalpel or thin blade to lift it.
The pin 30 must be completely isolated from its pad on the motherboard.

4.1.3 - Connecting the two PPUs
Once both pins have been correctly lifted and isolated:

- Lightly tin pin 24 of PPU1.
- Lightly tin pin 30 of PPU2.
- Use a fine wire, such as 30 AWG or smaller, to connect the two pins directly.
The resulting connection should be:
PPU1 - Pin 24 ↔ PPU2 - Pin 30
This connection will allow SNES OVERRIDE to control frequency selection on both PPUs simultaneously.
PPU1 - Pin 24 ↔ PPU2 - Pin 30
This connection will allow SNES OVERRIDE to control frequency selection on both PPUs simultaneously.


4.1.4 - PPU 50 Hz / 60 Hz control wire
Solder one final wire, initially about 10 cm long, to pin 30 of PPU2, which is already connected to pin 24 of PPU1.
Then route this wire to the other side of the motherboard through an available through-hole (via) nearby.
This wire is the 50 Hz / 60 Hz control line for the PPUs.
It will connect to point no. 6 on SNES OVERRIDE when you install the module, as detailed in the next chapter.
Then route this wire to the other side of the motherboard through an available through-hole (via) nearby.
This wire is the 50 Hz / 60 Hz control line for the PPUs.
It will connect to point no. 6 on SNES OVERRIDE when you install the module, as detailed in the next chapter.

Leave enough wire length to make the connection to SNES OVERRIDE easier. Also avoid routing the wire anywhere it could be pinched when the console is reassembled.
4.2 - Preparing 1CHIP consoles (S-CPUN / Ricoh 5A122)
This step applies to the 1CHIP revisions of the Super Nintendo / Super Famicom.
Unlike early console revisions that use several separate integrated circuits, 1CHIP motherboards combine the CPU and both PPU functions in a single integrated circuit.
Unlike early console revisions that use several separate integrated circuits, 1CHIP motherboards combine the CPU and both PPU functions in a single integrated circuit.
This section covers the following revisions:
- SNS-CPU-1CHIP-01
- SNS-CPU-1CHIP-02
- SNS-CPU-1CHIP-03
- SNSP-CPU-1CHIP-01
- SNSP-CPU-1CHIP-02
- SNN-CPU-01 - Super Nintendo / Super Famicom Jr.
If your console does not have a 1CHIP motherboard, this step does not apply to you.
This section of the guide is coming soon.
This section of the guide is coming soon.
5. Installing SNES OVERRIDE
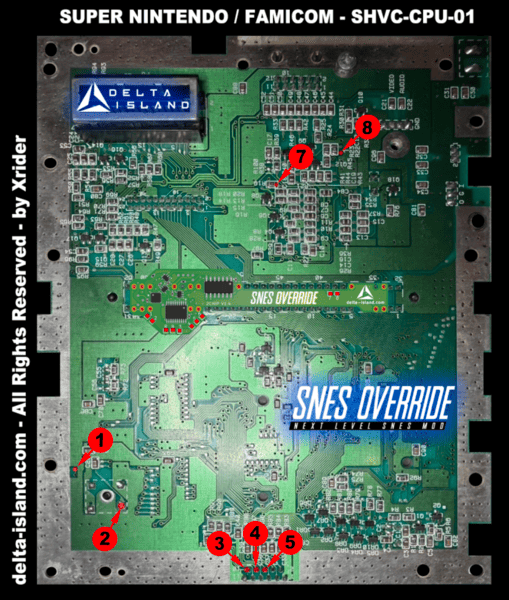
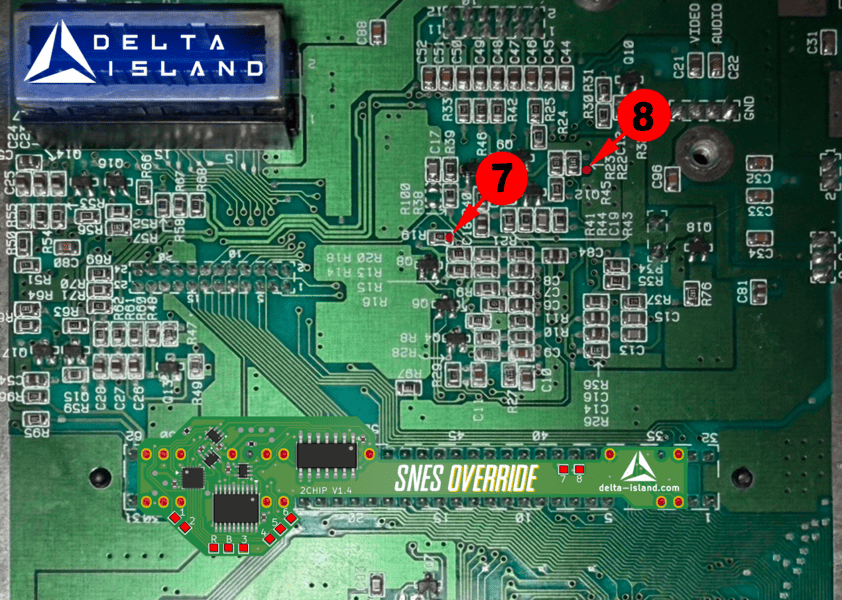
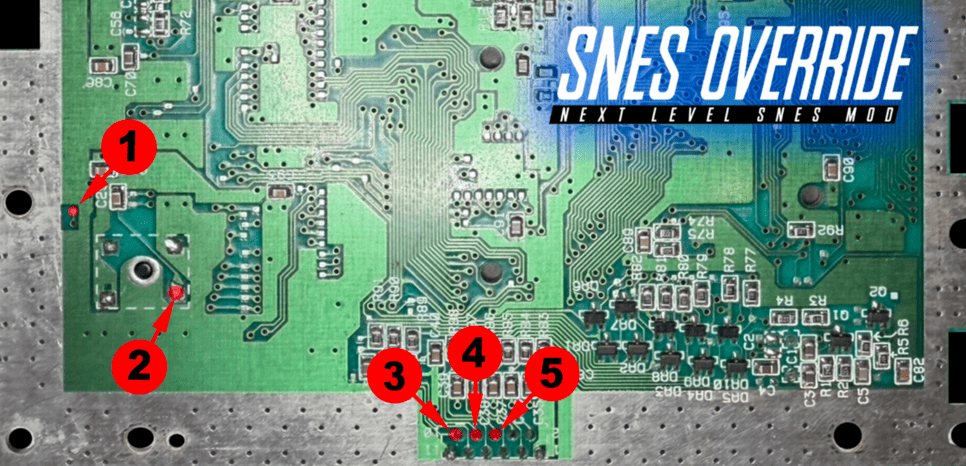
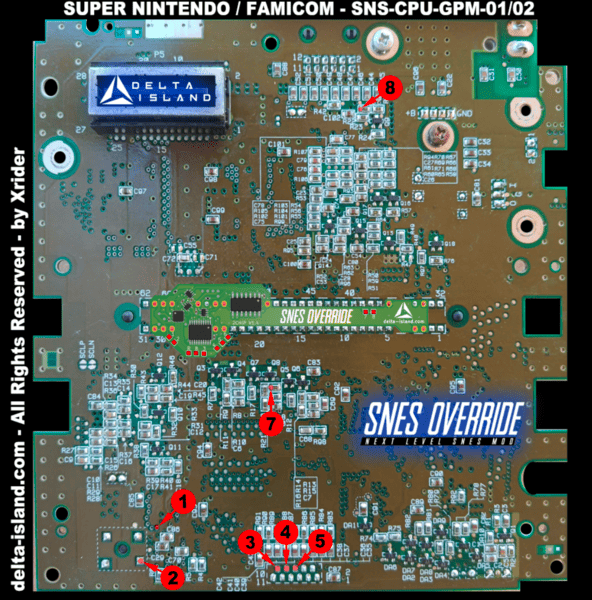
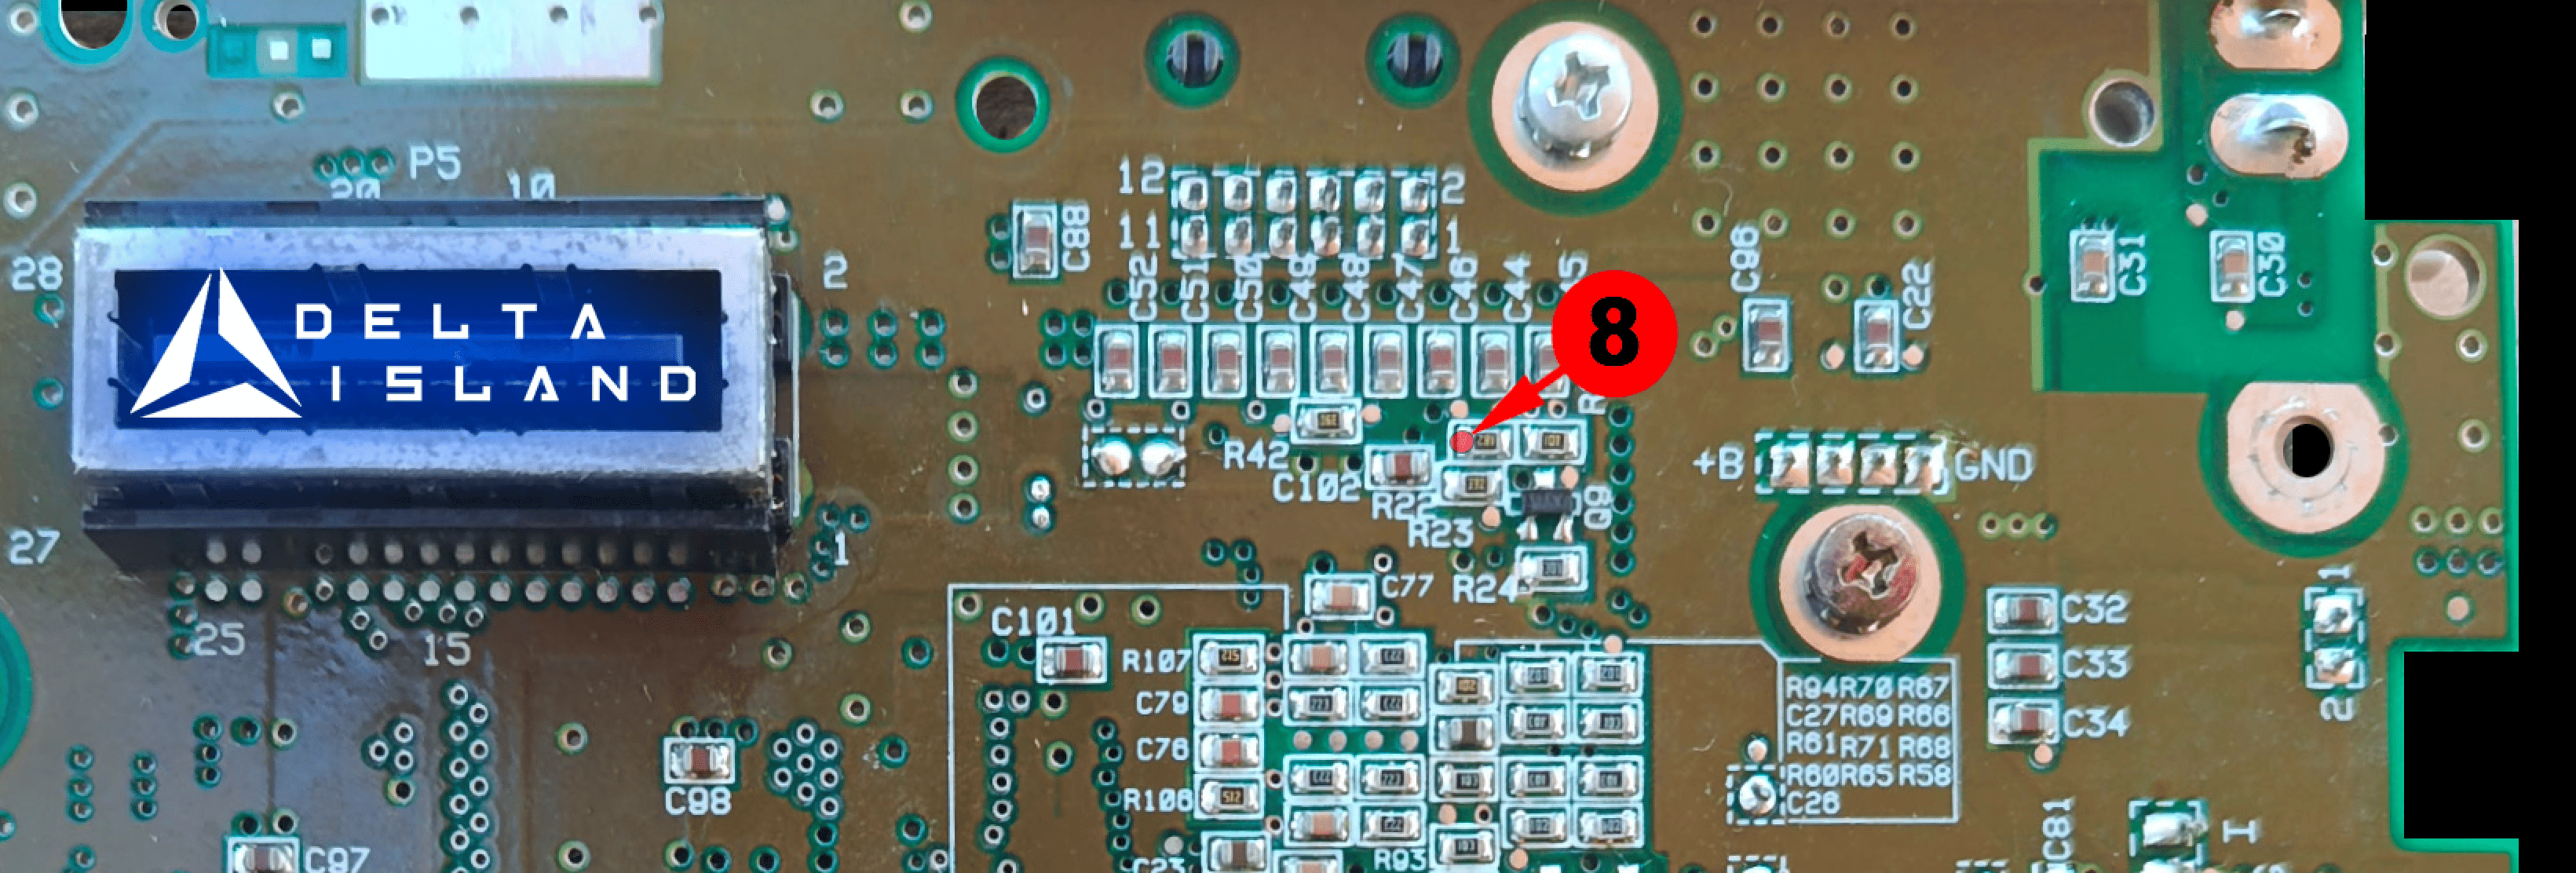
Position your SNES OVERRIDE on the back of the motherboard, as shown in the illustrations below.
Then make the solder connections marked in red, carefully following their indicated locations.
Then make the solder connections marked in red, carefully following their indicated locations.
For connections 1, 2, 3, 4, 5, 6, 7 and 8, we recommend using fine 30 AWG wire or smaller. Small-diameter wire is easier to route, reduces mechanical stress on solder joints and helps achieve a cleaner installation.
Installing the bi-color LED supplied with SNES OVERRIDE is entirely optional. Refer to chapter 6 for installation instructions.
Installing the bi-color LED supplied with SNES OVERRIDE is entirely optional. Refer to chapter 6 for installation instructions.
5.1 - SHVC-CPU-01 motherboard
5.2 - SNSP-CPU-01, SNSP-CPU-02 motherboards


5.3 - SNS-CPU-GPM-01, SNS-CPU-GPM-02 motherboards


5.4 - SNS-CPU-RGB-01, SNS-CPU-RGB-02 motherboards
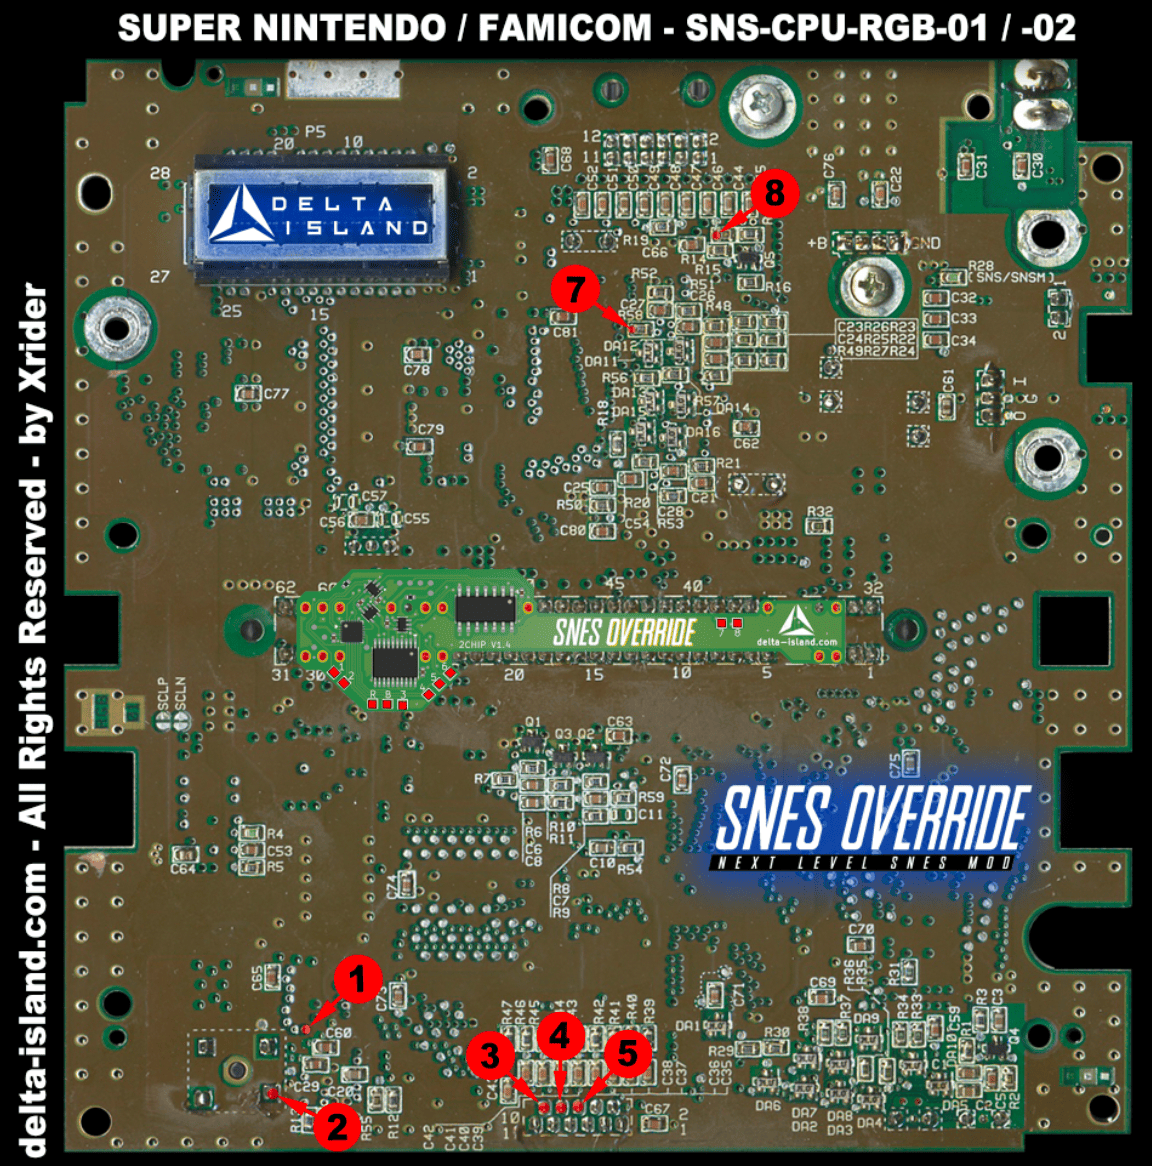

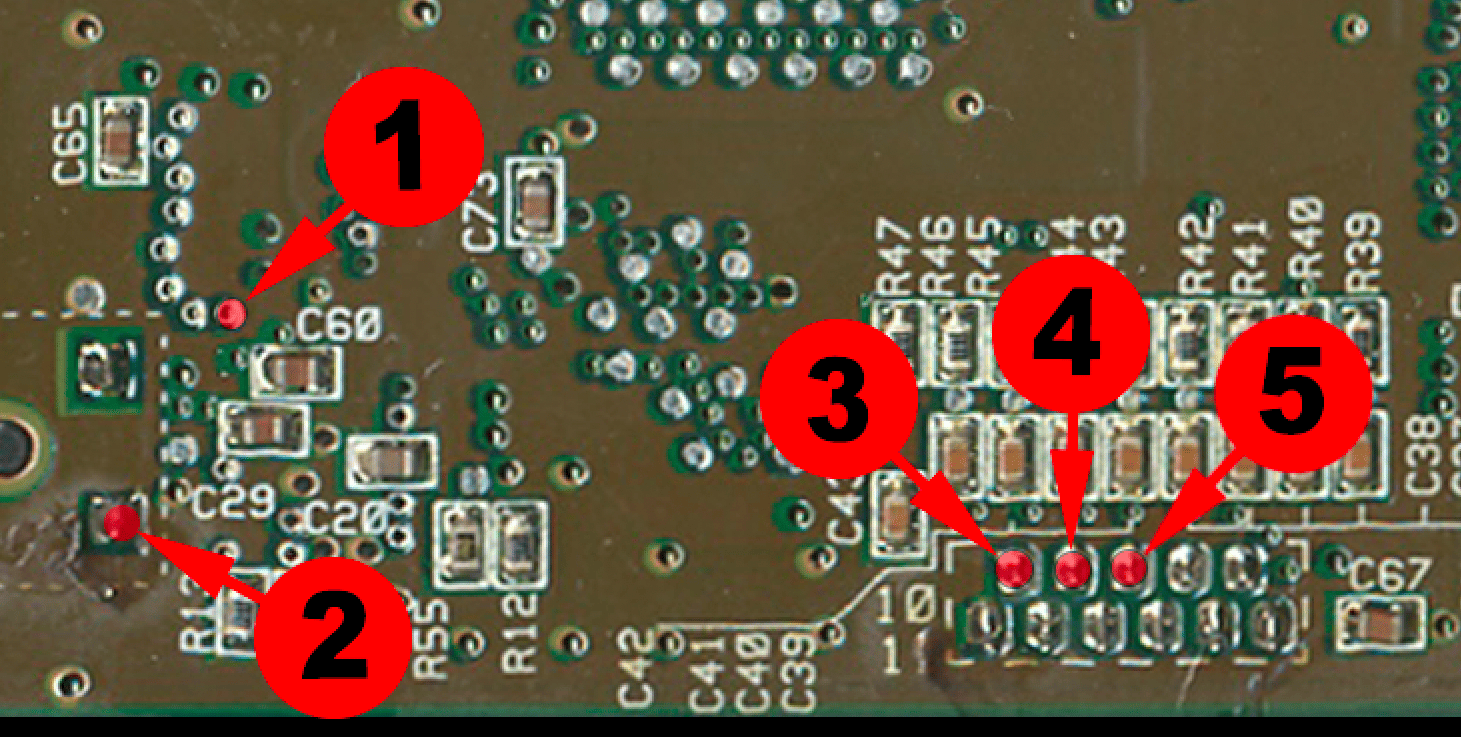
5.5 - SNS-CPU-APU-01 motherboard
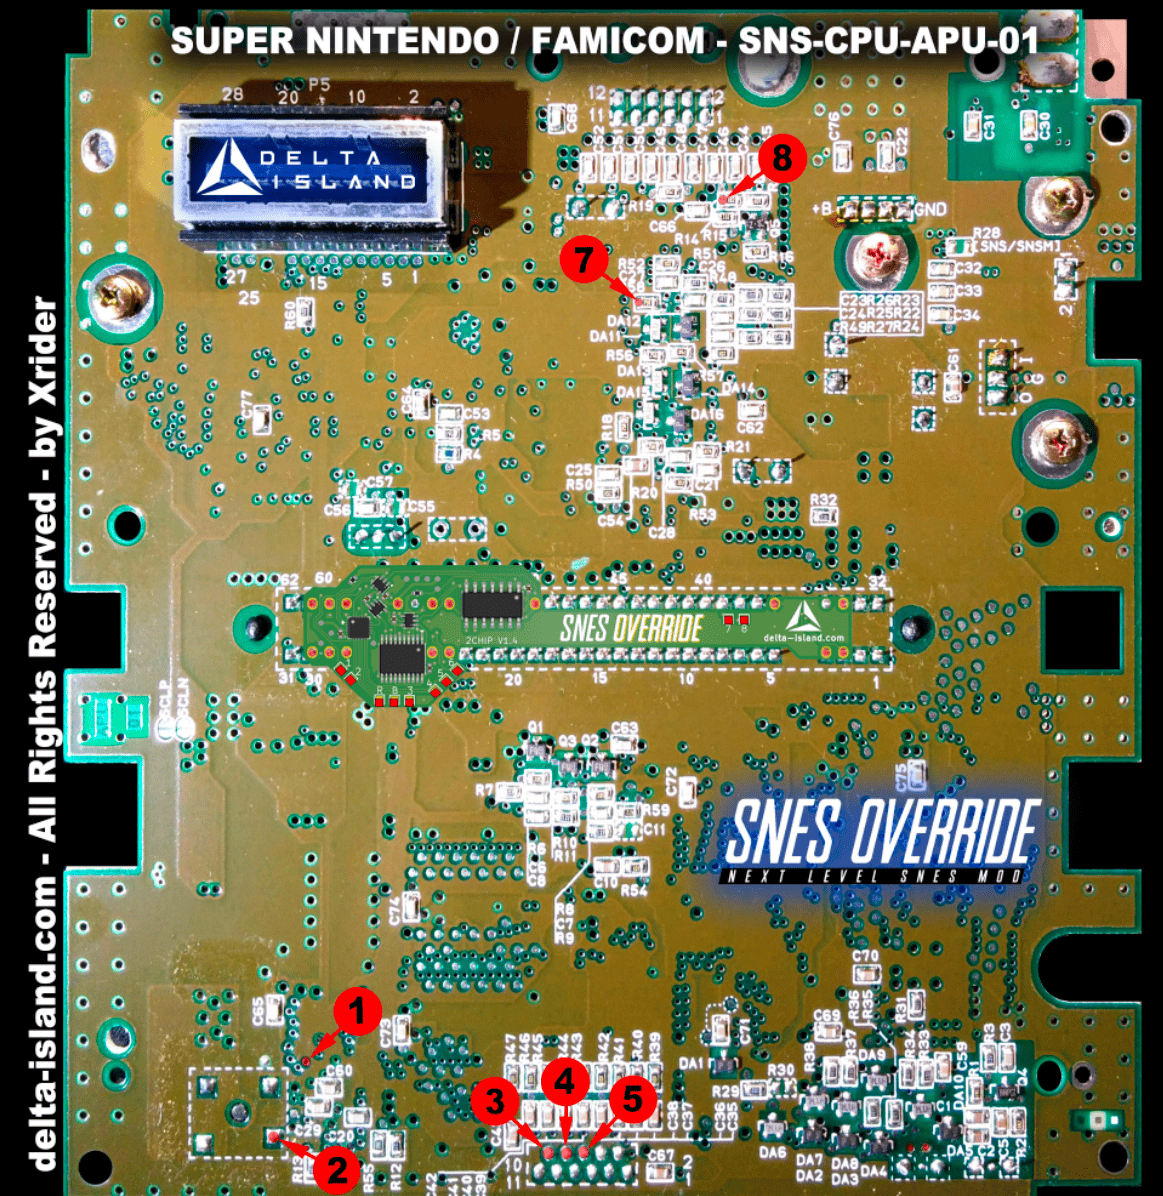
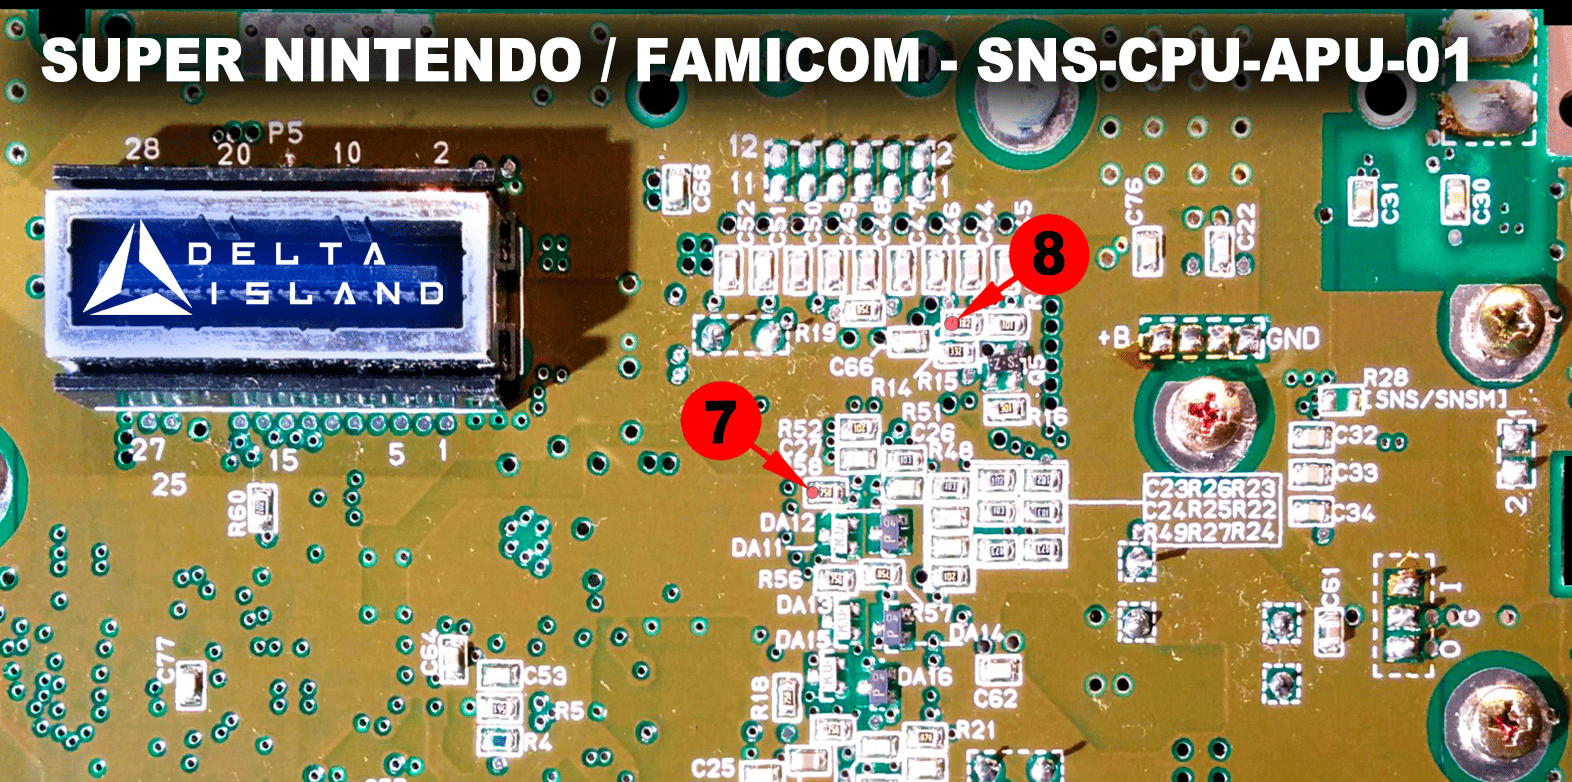
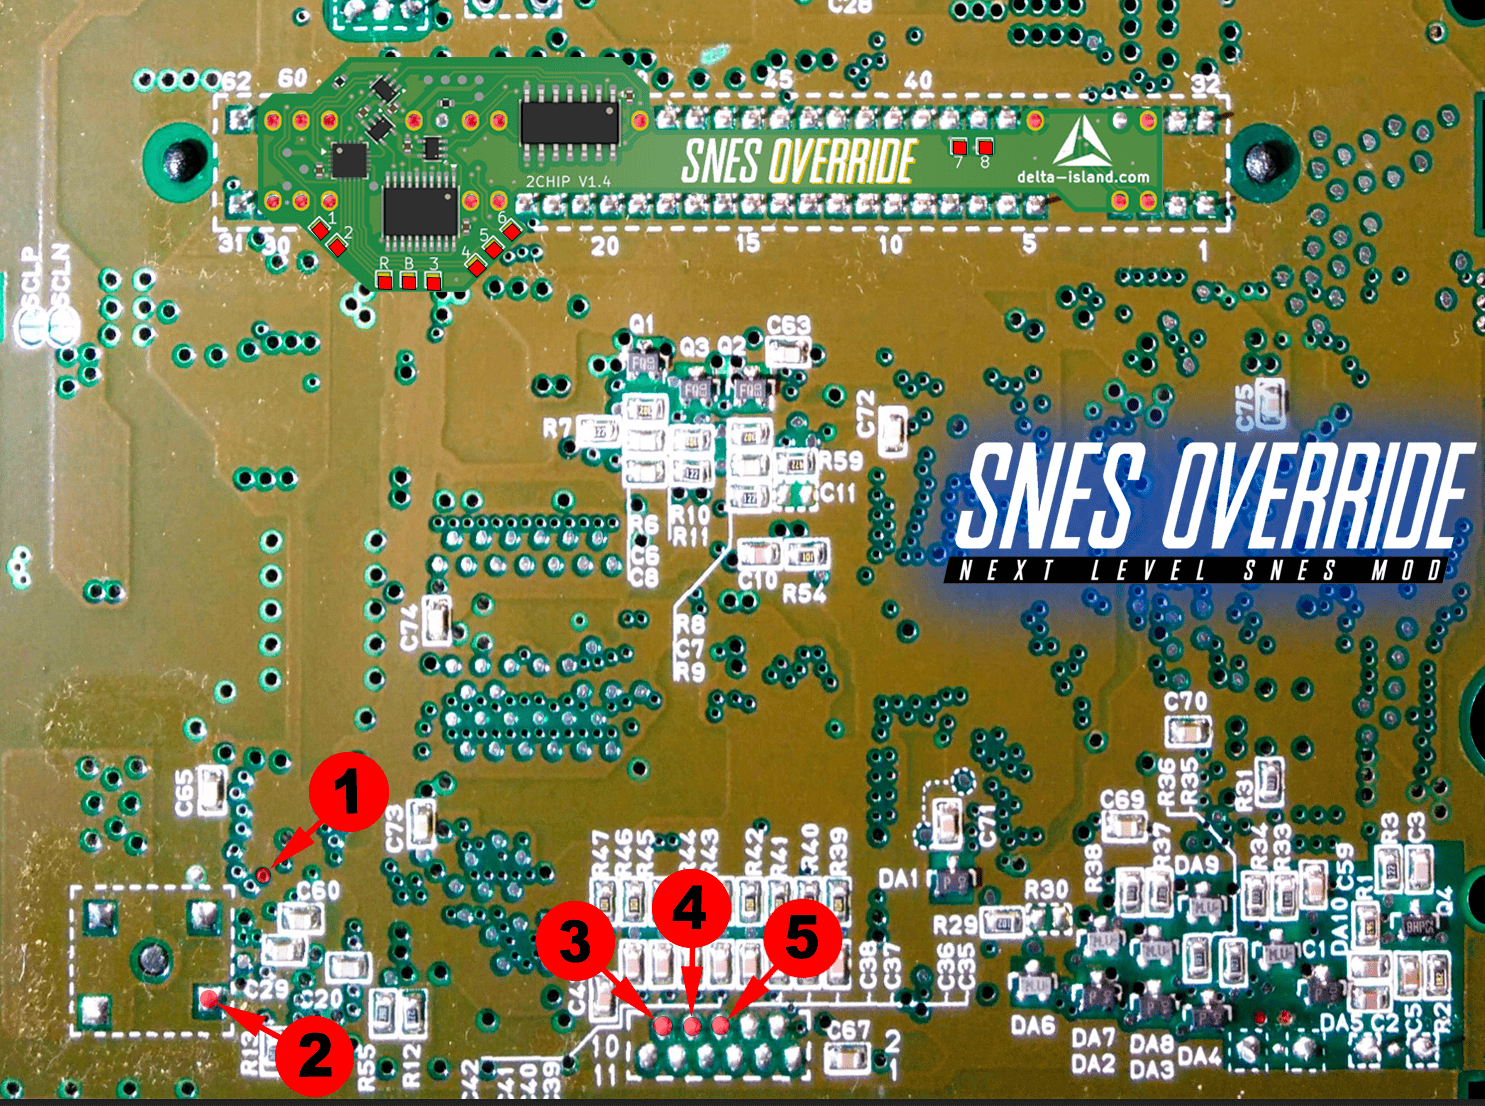
5.6 - SNS-CPU-1CHIP-01, SNS-CPU-1CHIP-02, SNS-CPU-1CHIP-03 motherboards
Coming soon
5.7 - SNSP-CPU-1CHIP-01, SNSP-CPU-1CHIP-02 motherboards
Coming soon
5.8 - SNN-CPU-01 (SNES Jr) motherboard
Coming soon
6 - Installing the LED on the controller port board (optional)
Although optional, the bi-color LED supplied with SNES OVERRIDE lets you instantly identify the selected video mode.
6.1 - Installing the bi-color LED - PAL Super Nintendo / JPN Super Famicom
Bi-color LED pinout
SNES OVERRIDE comes with a 3 mm red/blue common-anode bi-color LED.
Using your soldering iron and flat-nose pliers, remove the original red LED from the controller port board.
Using your soldering iron and flat-nose pliers, remove the original red LED from the controller port board.


The different lead lengths on the bi-color LED make it easy to identify the Red, Blue and the common anode (+) connections.
Short lead: BLUE
Center lead: + : common positive connection (common anode)
Long lead: RED
Center lead: + : common positive connection (common anode)
Long lead: RED

LED operating colors
- RED : 50 Hz
- BLUE : 60 Hz
- PURPLE : AUTO
Then position the bi-color LED where the original LED was installed.
Using flush cutters, trim the center lead to length, then solder it as shown in the following diagram:
Using flush cutters, trim the center lead to length, then solder it as shown in the following diagram:

Identify the R and B connections from the lengths of the bi-color LED’s outer leads.
Trim the outer leads to length with your flush cutters.
Using fine 30 AWG wire or smaller, connect the LED’s two other leads to the corresponding points on SNES OVERRIDE:
Trim the outer leads to length with your flush cutters.
Using fine 30 AWG wire or smaller, connect the LED’s two other leads to the corresponding points on SNES OVERRIDE:
- B : BLUE
- R : RED

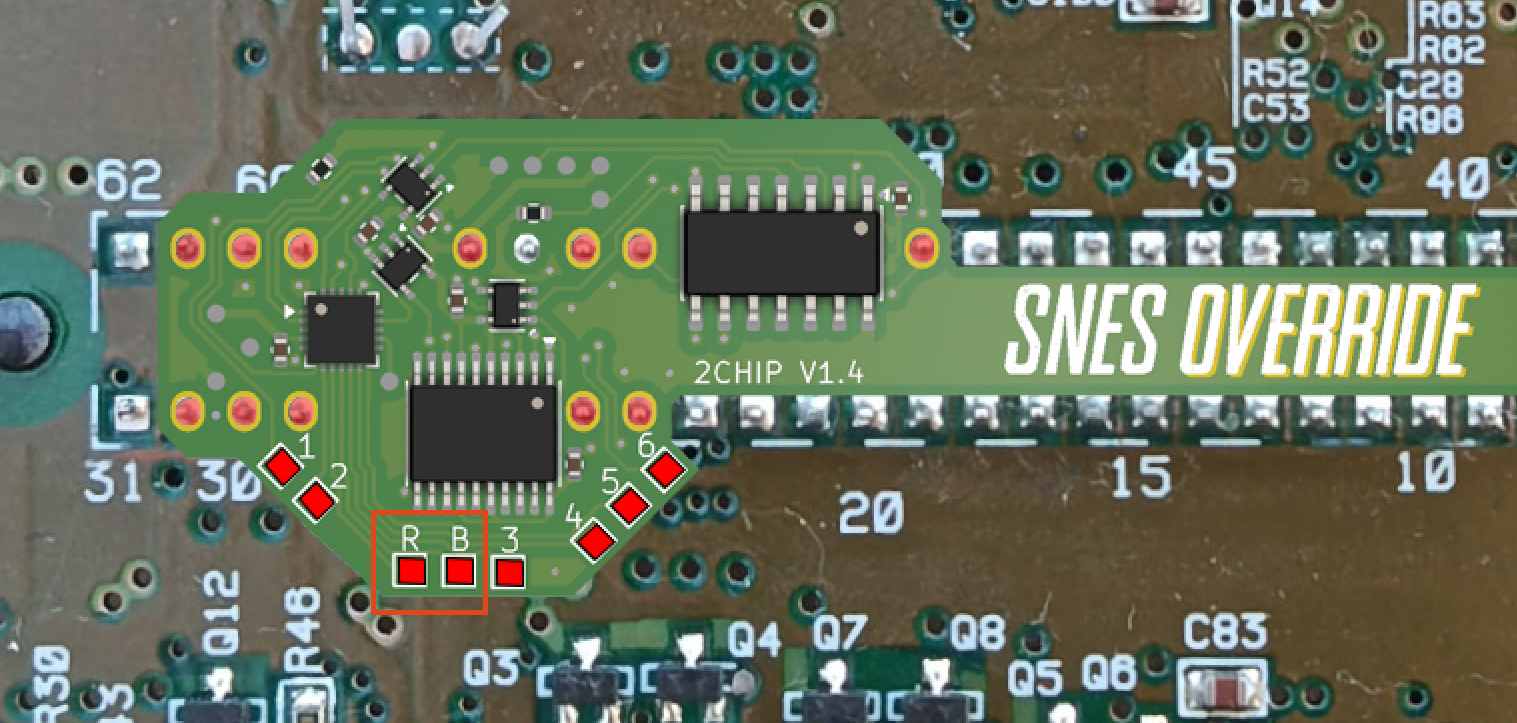
6.2 - Installing the bi-color LED - USA Super Nintendo
Coming soon
6.3 - Installing the bi-color LED - Super Nintendo Jr/ Super Famicom Jr
Coming soon
7 - Using SNES OVERRIDE
The SNES OVERRIDE can be controlled entirely from the Player 1 controller.
To activate a feature, hold the indicated buttons simultaneously for 2 seconds.
To activate a feature, hold the indicated buttons simultaneously for 2 seconds.
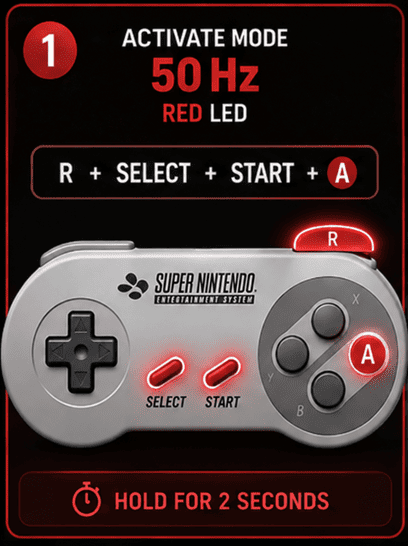
50 Hz MODE
R + SELECT + START + A
Forces the Super Nintendo into 50 Hz
R + SELECT + START + A
Forces the Super Nintendo into 50 Hz
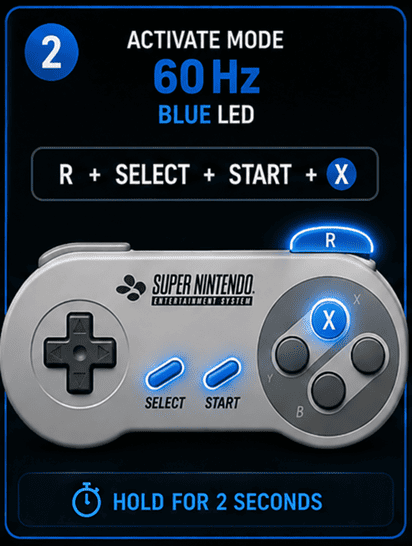
60 Hz MODE
R + SELECT + START + X
Forces the Super Nintendo into 60 Hz
R + SELECT + START + X
Forces the Super Nintendo into 60 Hz
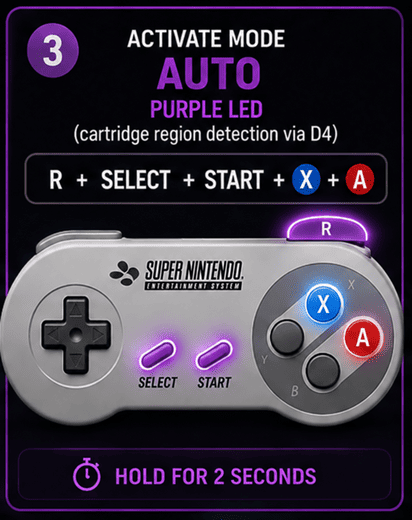
AUTO MODE
R + SELECT + START + A + X
Detects the cartridge’s region and automatically adjusts the console’s video mode
R + SELECT + START + A + X
Detects the cartridge’s region and automatically adjusts the console’s video mode
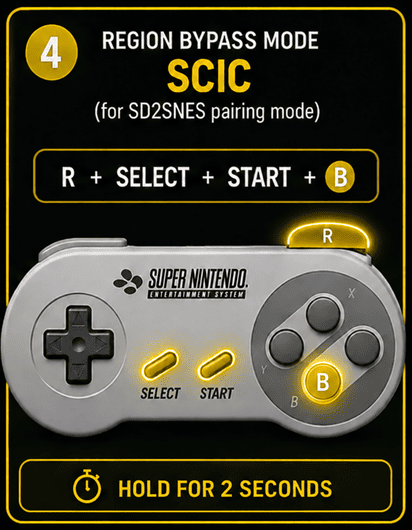
REGION PASS-THROUGH
R + SELECT + START + B
Allows the FXPak Pro / SD2SNES to send region information to SNES OVERRIDE
R + SELECT + START + B
Allows the FXPak Pro / SD2SNES to send region information to SNES OVERRIDE

IN-GAME RESET
L + R + SELECT + START
Restarts the Super Nintendo directly from the controller
L + R + SELECT + START
Restarts the Super Nintendo directly from the controller
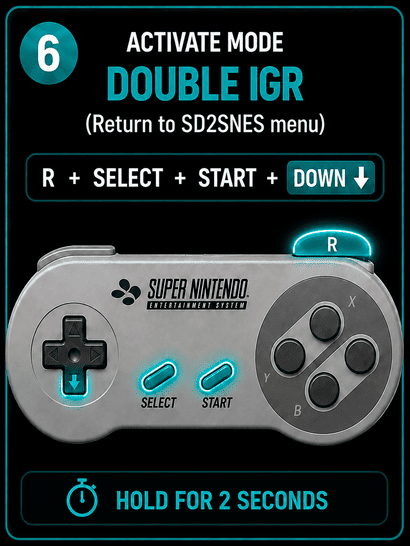
RETURN TO FXPak Pro / SD2SNES
R + SELECT + START + DOWN
Performs a double reset and returns directly to the menu of the FXPak Pro / SD2SNES
R + SELECT + START + DOWN
Performs a double reset and returns directly to the menu of the FXPak Pro / SD2SNES
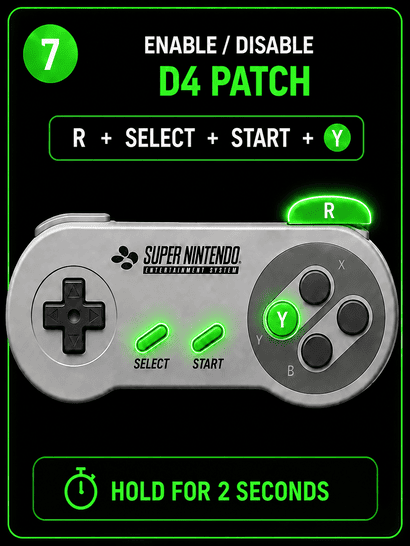
D4 PATCH
R + SELECT + START + Y
Enables or disables the D4 Patch. Its status is confirmed by the OSD and saved automatically
R + SELECT + START + Y
Enables or disables the D4 Patch. Its status is confirmed by the OSD and saved automatically
Your selected settings are saved automatically and restored the next time you turn on the console.
8 - FAQ - Frequently asked questions
Is it normal for the D4 Patch not to work with the SD2SNES / FXPak Pro?
The SD2SNES / FXPak Pro already applies its own region patch. If the SNES OVERRIDE D4 Patch is also enabled, the two systems may conflict.
Recommended configuration:
- SD2SNES / FXPak Pro: Auto Region Patch ON and SuperCIC ON
- SNES OVERRIDE: D4 OFF
The SD2SNES / FXPak Pro already applies its own region patch. If the SNES OVERRIDE D4 Patch is also enabled, the two systems may conflict.
Recommended configuration:
- SD2SNES / FXPak Pro: Auto Region Patch ON and SuperCIC ON
- SNES OVERRIDE: D4 OFF
Can I completely remove the CIC to install SNES OVERRIDE?
Yes. However, we recommend lifting only the four required CIC pins to disable it while keeping the component in place.
It is nevertheless perfectly possible to desolder and completely remove the original CIC.
Yes. However, we recommend lifting only the four required CIC pins to disable it while keeping the component in place.
It is nevertheless perfectly possible to desolder and completely remove the original CIC.
Invisible on the outside. A complete system on the inside.
SNES OVERRIDE • Your console. Your region. Your rules.
Discover SNES OVERRIDE in the Delta Store →