")
")
Tutorial • PlayStation / PSone • Modchip • Delta PSNee QSB
Delta PSNee QSB – Installation Guide
This tutorial will guide you step by step through the installation of the Delta PSNee QSB modchip on your PlayStation or PSone console. The Delta PSNee QSB range covers all motherboard revisions (PU-7 → PU-23 + PM-41 / PM-41(2)) thanks to multiple dedicated QSB versions.
🧩 Wire-free QSB 🕵️ Stealth mode 🌍 Imports + CD-R 🧠 Optimized PSNee code
🛒 Available in the Delta Store: Delta PSNee QSB PS1 Modchip
Choose the QSB version matching your motherboard revision (PU-7 to PU-23, PM-41 / PM-41(2)). Ideal for a fast, clean, and reliable installation.
Tip: once your motherboard is identified (PU/PM), pick the dedicated QSB to avoid any mistakes.
Key points
✅
Difficulty
Level 1 (QSB), but requires clean soldering.
Level 1 (QSB), but requires clean soldering.
⚡
Safety
Always powered off + discharge capacitors.
Always powered off + discharge capacitors.
🧬
Key step
Identify the motherboard (PU/PM) before purchase/install.
Identify the motherboard (PU/PM) before purchase/install.
Video: https://www.youtube.com/watch?v=AqjenA1qFDI
🔒 Important safety instructions
⚠️ MUST be done with power OFF
• Fully unplug the console (power + all cables).
• Press Power (with the console unplugged) to help drain residual charge.
• Wait ~2 hours (minimum) for capacitors to fully discharge.
• Never work on the console while it is powered.
• Press Power (with the console unplugged) to help drain residual charge.
• Wait ~2 hours (minimum) for capacitors to fully discharge.
• Never work on the console while it is powered.
✨ Features – Why Delta PSNee QSB?
Simplified installation
- Easy, fast, wire-free installation (QSB)
- No complex wired install diagram needed
- Clean, repeatable fitment
Compatibility & use cases
- Plays imports*
- Plays CD-R backups
- Covers all revisions via multiple dedicated QSBs
*Note: some NTSC J PS1 consoles (JPN SCPH-3000+) have an extra security layer (see the “JPN” block below).
Stealth
- Stealth modchip, compatible with “anti-modchip” games (e.g., Dino Crisis JPN)
- SCEX triggered based on optical position + SLEEP mode
- Latest-generation microcontroller (20 MHz)
🧰 Required tools
- Delta PSNee QSB (version matching your motherboard)
- Phillips screwdriver
- Soldering iron (fine tip recommended)
- Electronics solder
- (Recommended) Flux + magnifier / microscope
🌍 PlayStation / PSone compatibility
The Delta PSNee QSB range covers the following PlayStation / PSone consoles (all regions):
NTSC J note (JPN SCPH-3000+): some Japanese consoles include an additional security layer. To play imports, install a Delta PSNee QSB and follow this tutorial: CD Boot “ImportPlayer Light - JPN”
Alternative: Delta PSNee QSB + Action Replay (all versions, with or without Unlock CDROM).
Alternative: Delta PSNee QSB + Action Replay (all versions, with or without Unlock CDROM).
✅ 1 - Identify your PlayStation console
Locate the label under your console and write down the model (e.g., SCPH-7502). This is useful, but to choose the correct QSB, you must confirm the motherboard revision (PU/PM).
Tip: note the model, then go to step 3 to precisely identify your motherboard.
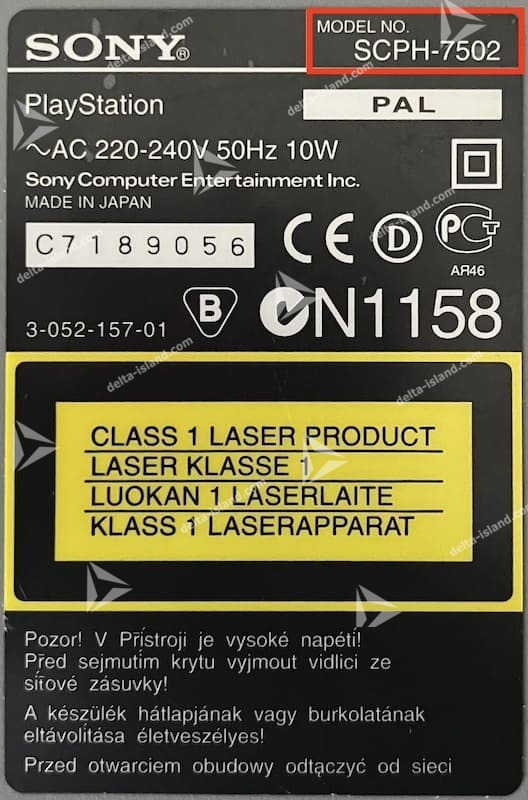
Label located under the console (example).
🔧 2 - Disassemble the PlayStation console
⚠️ WARNING – Electrical safety
Unplug everything, press Power, then let the console rest for ~2 hours to allow full capacitor discharge. Do not touch the internal power supply.
🎥 Disassembly videos (by model)
• SCPH-100X / 3X00 / 5000: https://www.youtube.com/watch?v=2r-CYOSpK60
• SCPH-55XX: https://www.youtube.com/watch?v=60c8RCtIHcM
• SCPH-700X: https://www.youtube.com/watch?v=qwIF1dMs4NI
• SCPH-750X: https://www.youtube.com/watch?v=YYdv0yaCf2I
• SCPH-900X: https://www.youtube.com/watch?v=S-FjMUm2Gog
Goal: access the motherboard. You do not need to disassemble the power supply—please do not touch it.
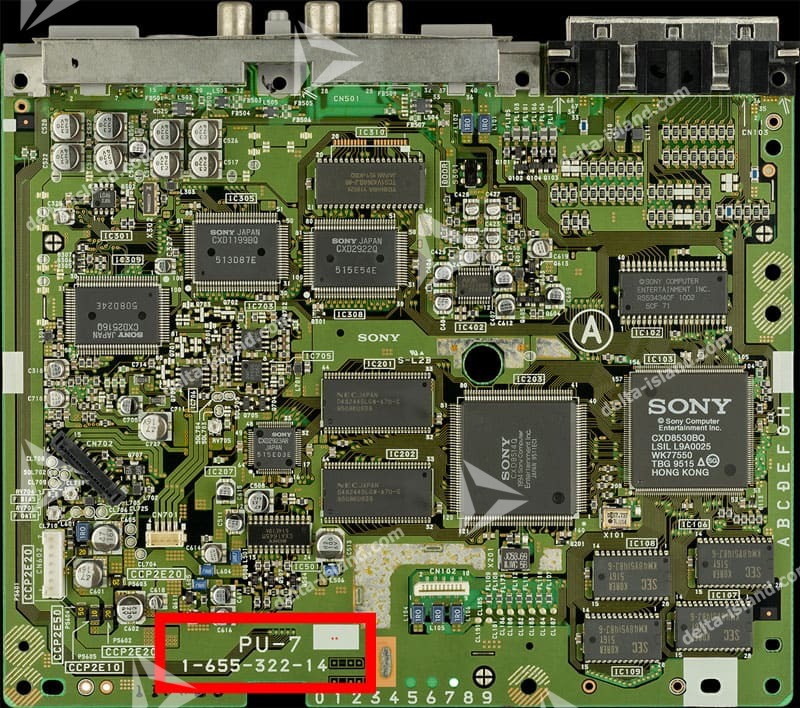
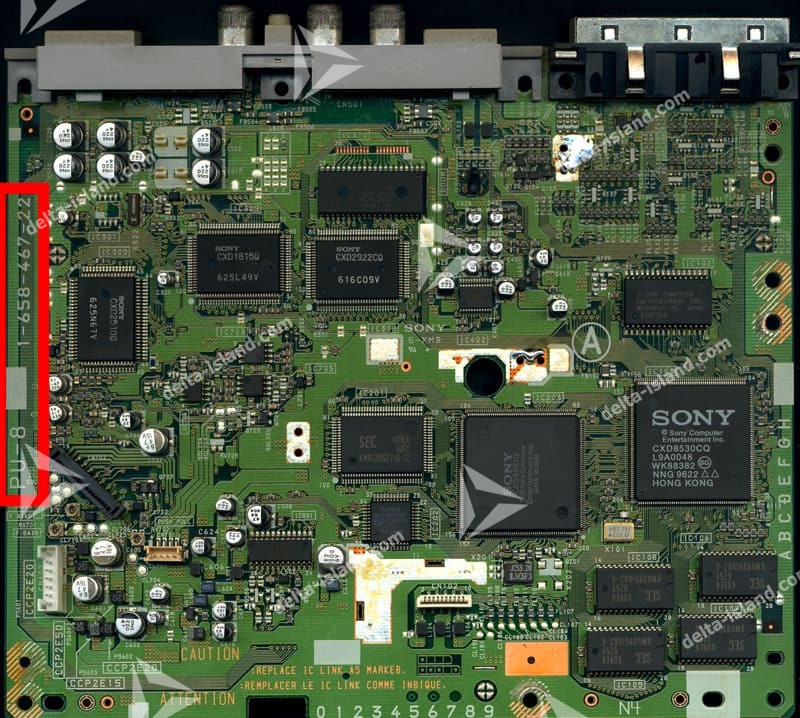
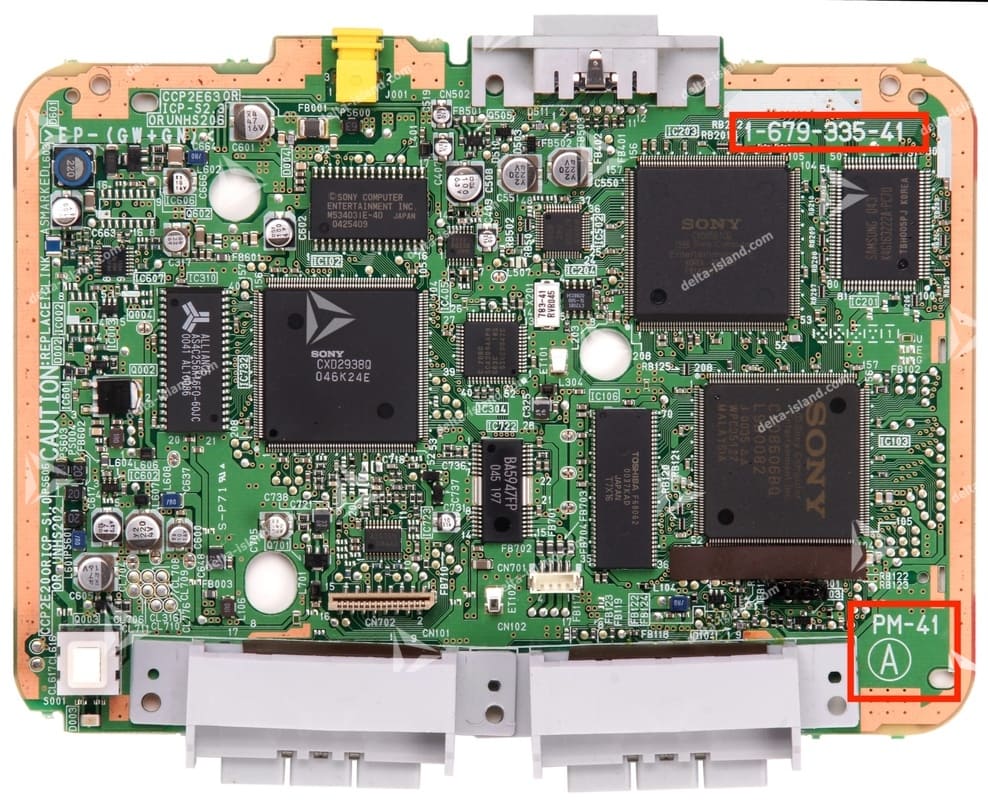
🧭 3 - Identify your motherboard (PU / PM)
Once the console is open, identify the motherboard using the photos below. This step is essential to select a compatible Delta PSNee QSB.


.jpg)
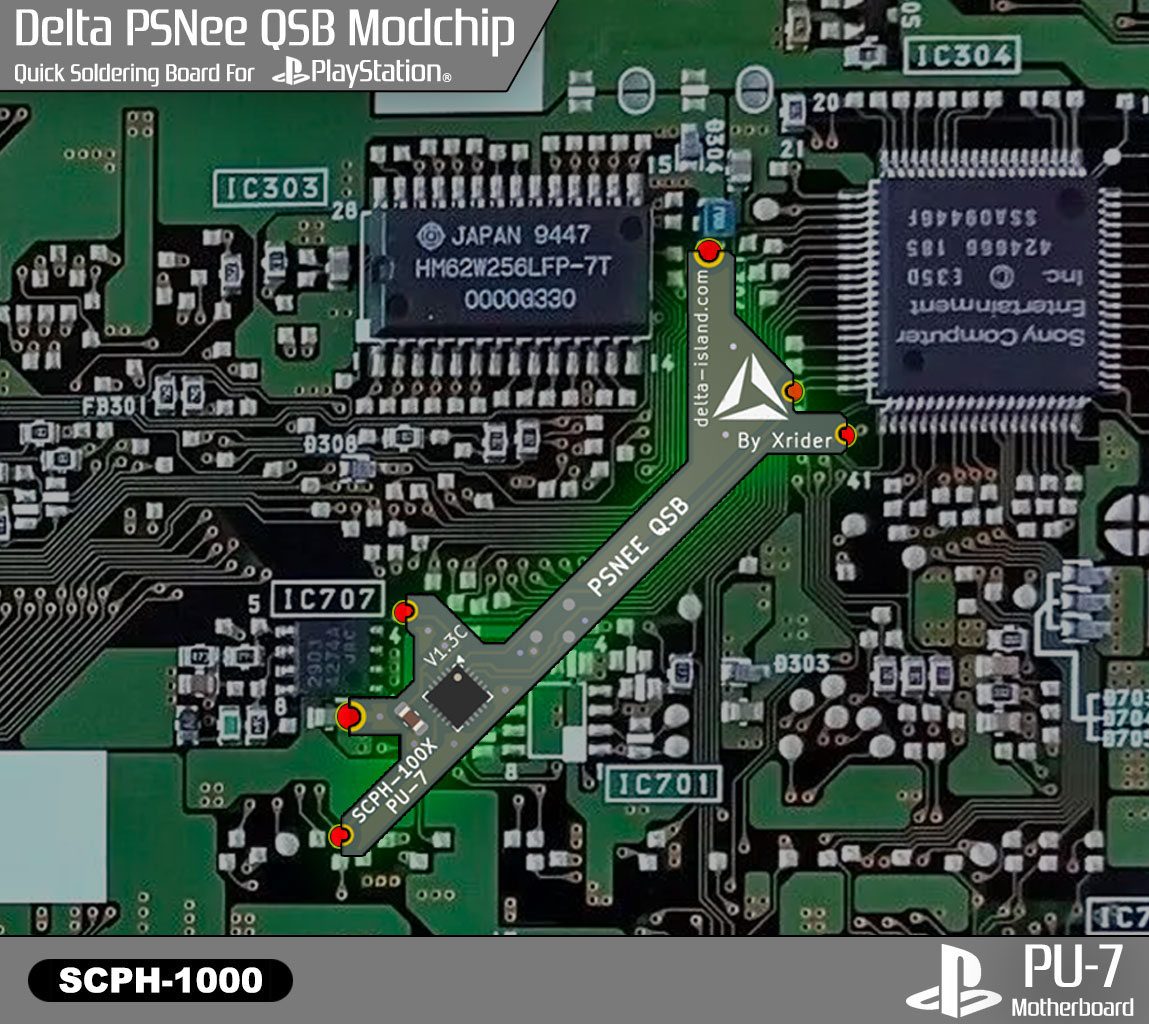
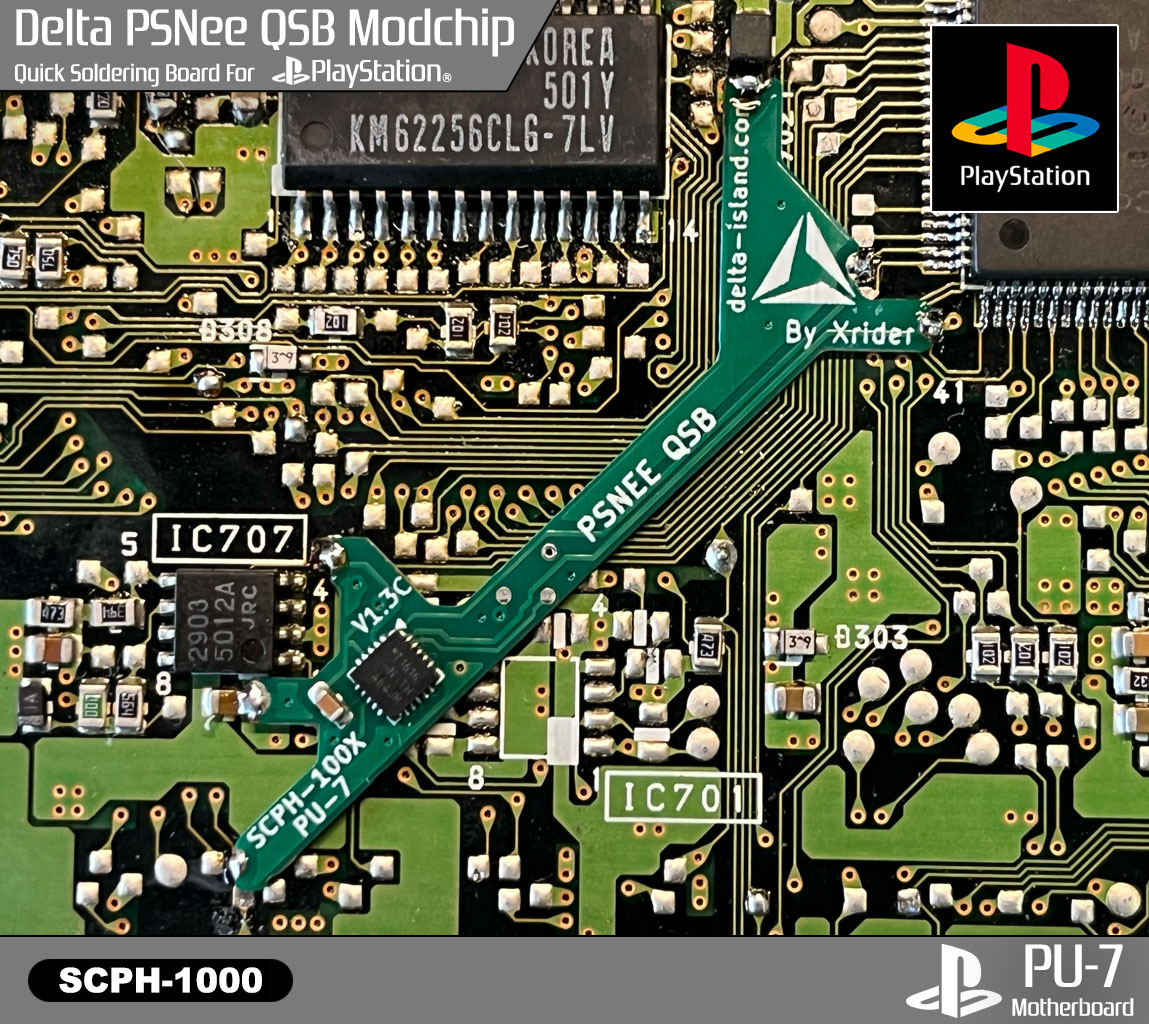
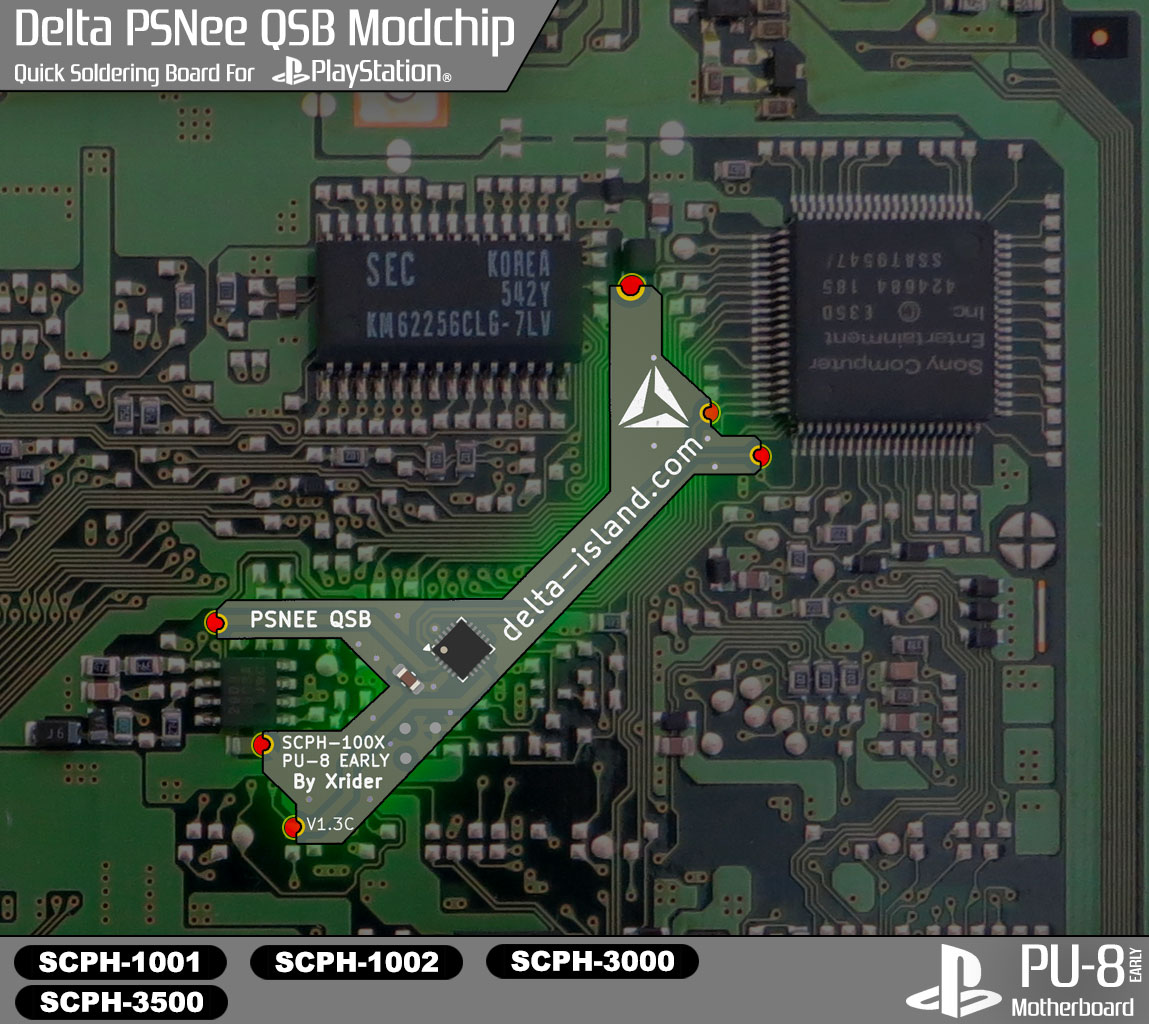
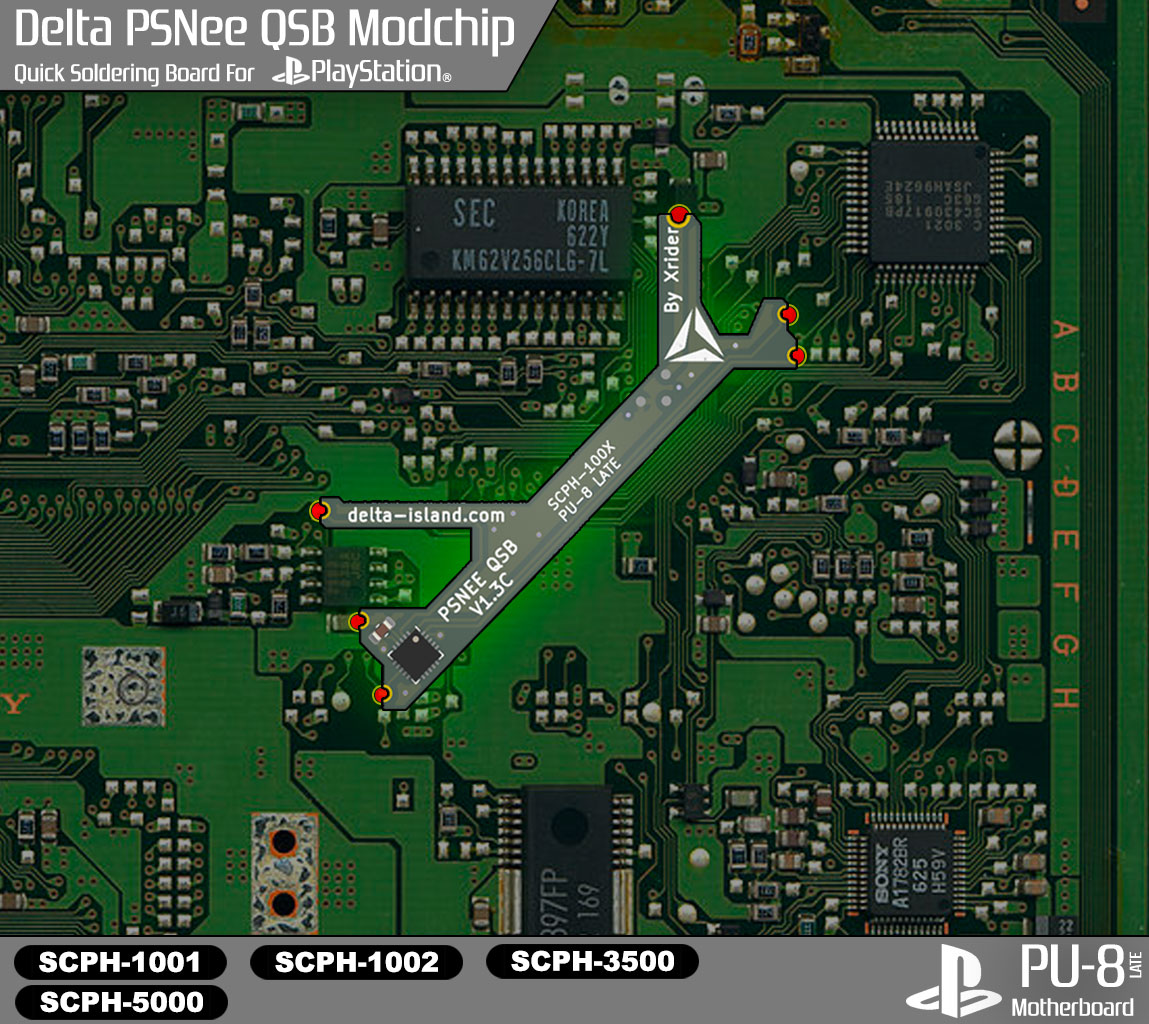
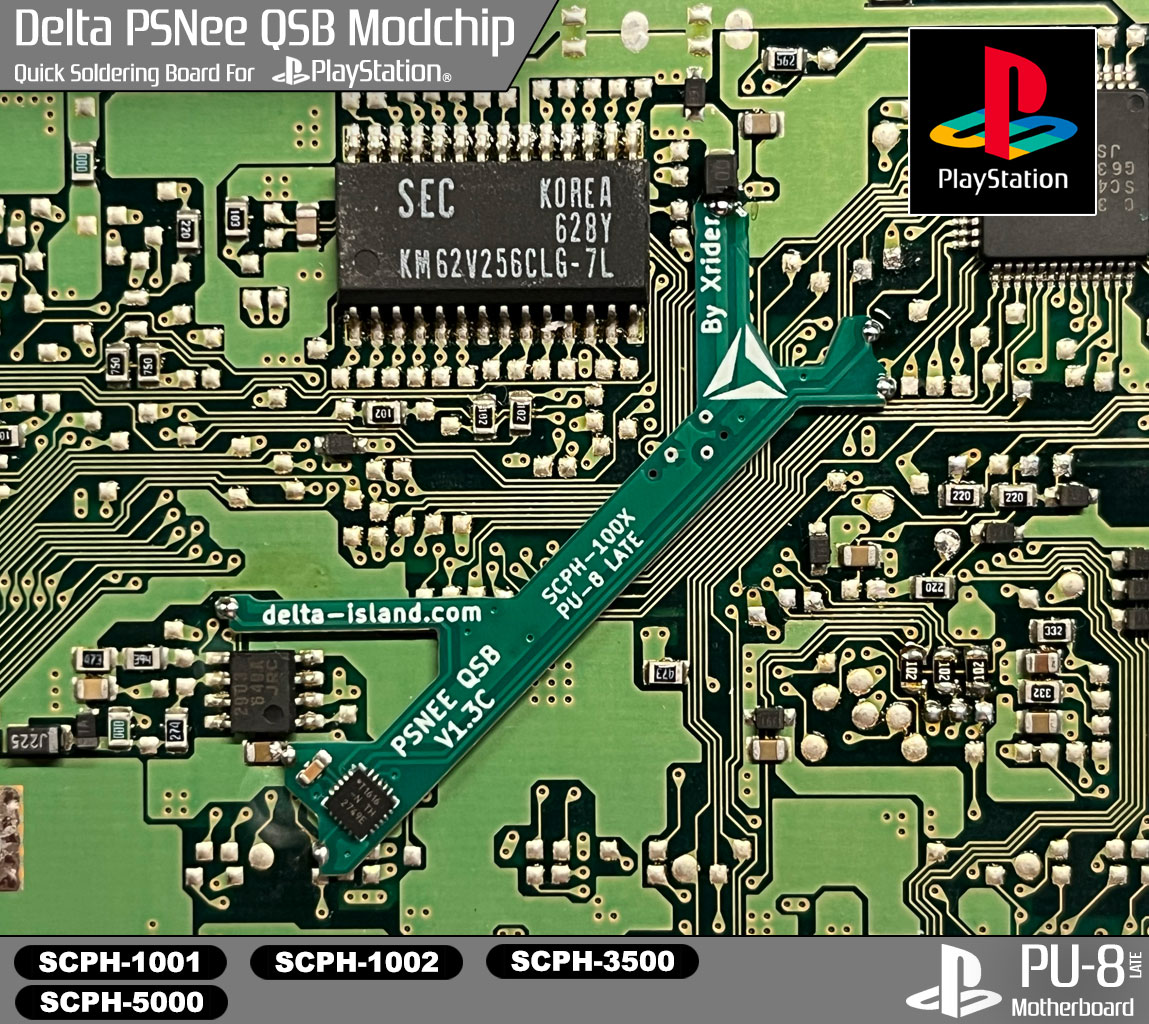
🧩 4 - Delta PSNee QSB installation (by motherboard)
PU-7 motherboard
QSB placement + verification

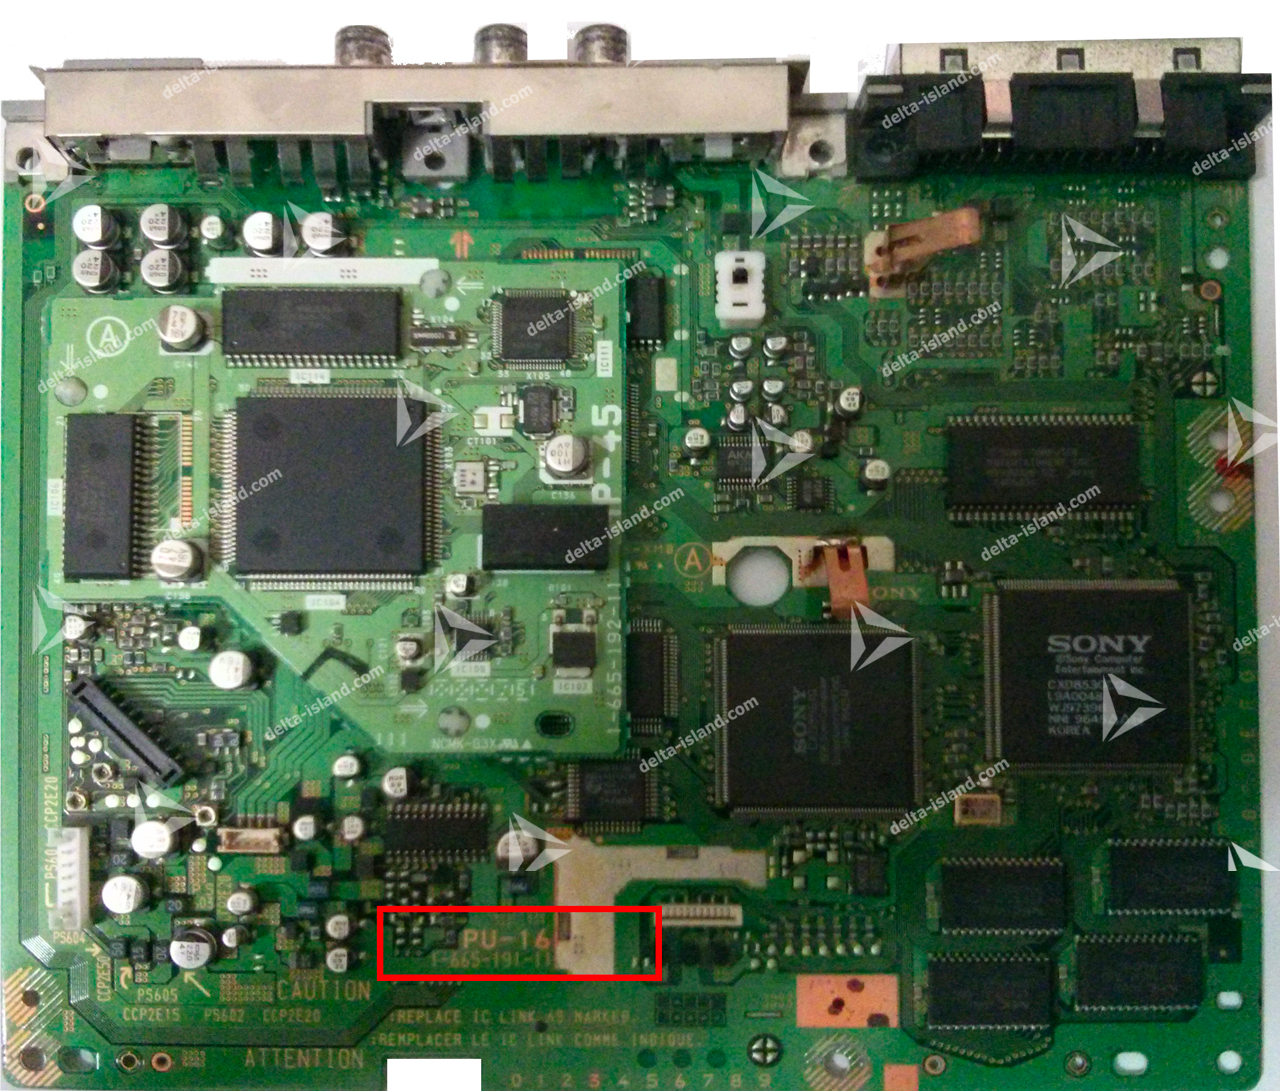
PU-16 motherboard (SCPH-5903 only)
VideoCD support preserved
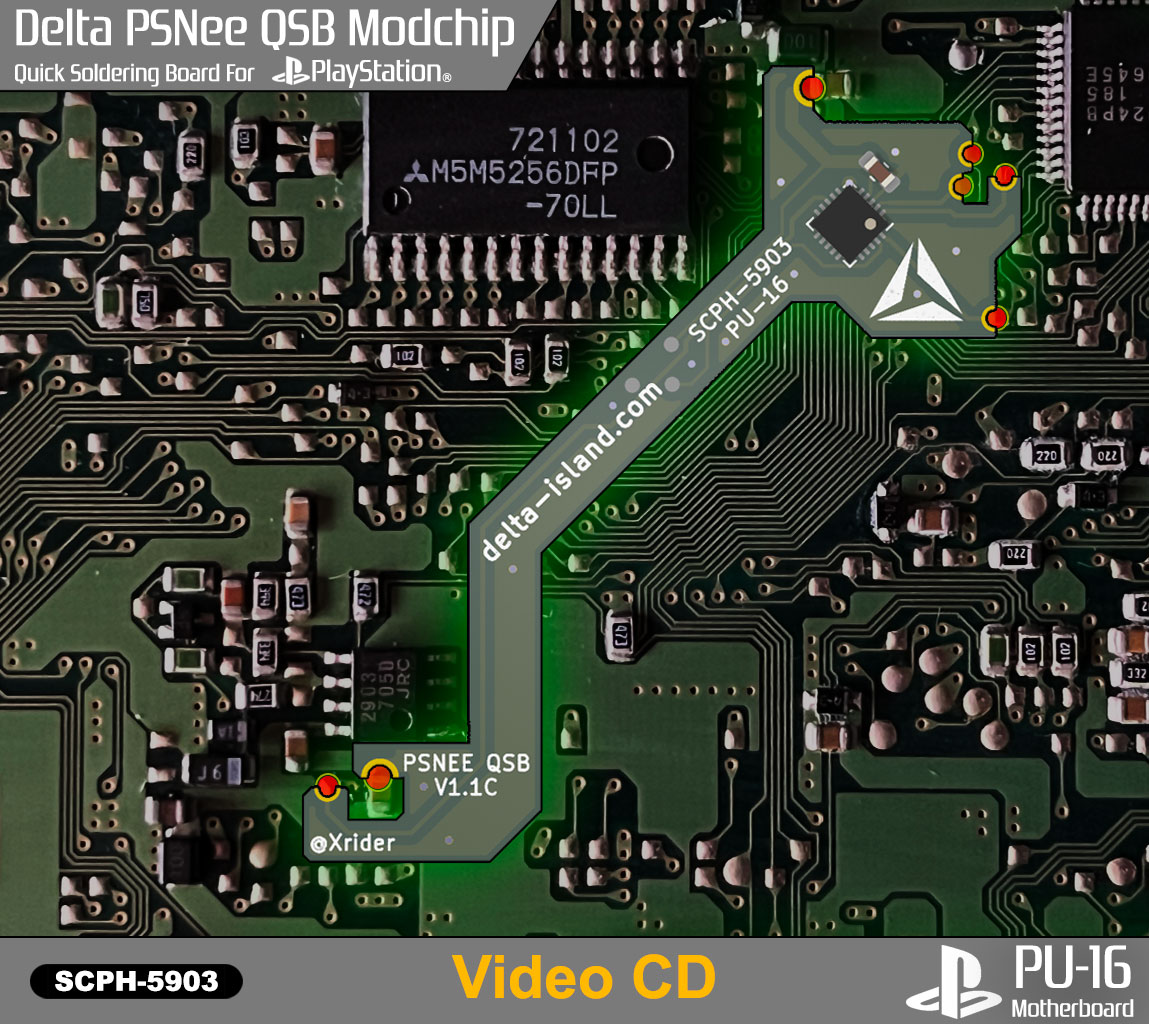
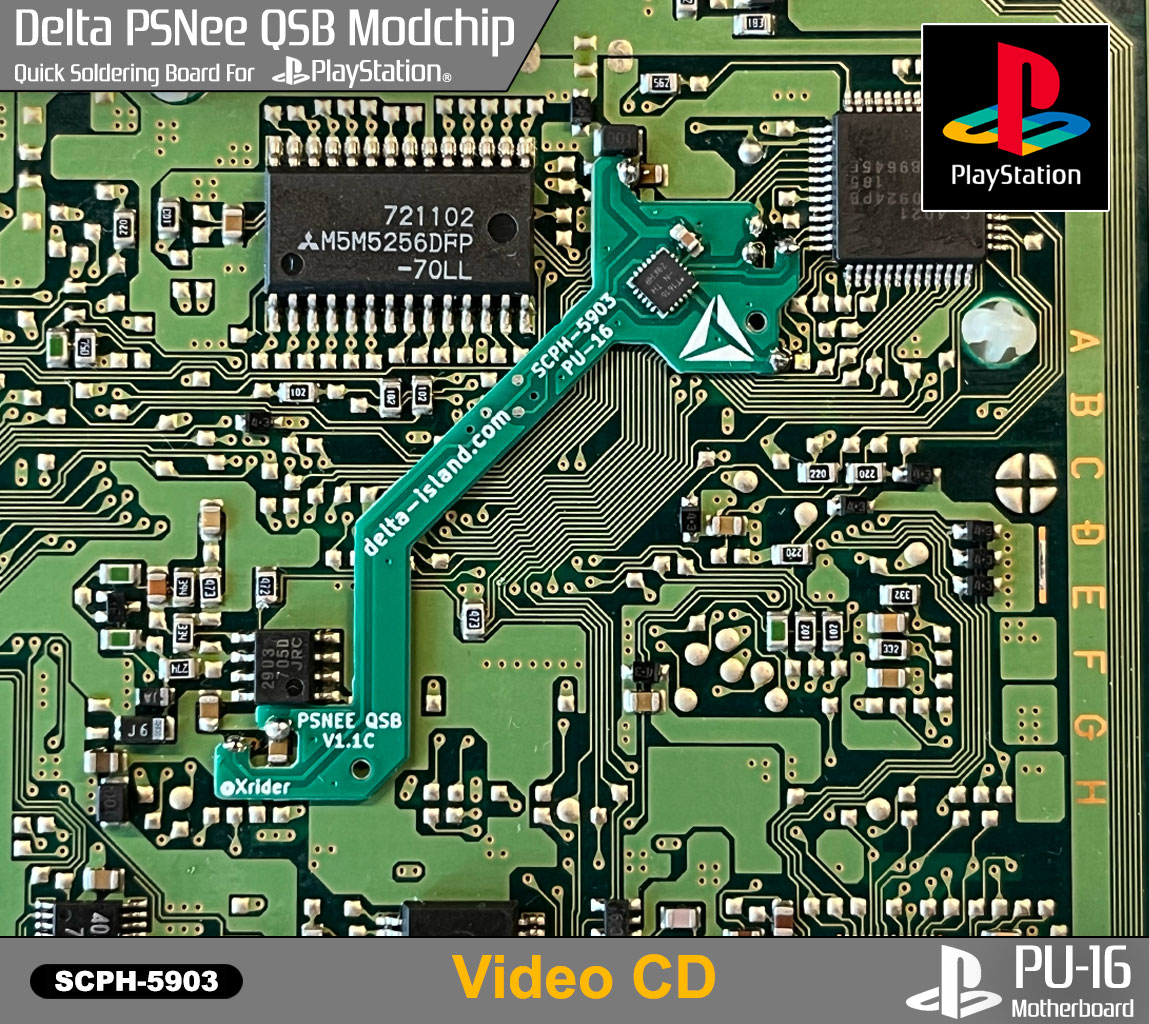
SCPH-5903 info: VideoCD features remain functional.
1) Open the CD lid
2) Power on the console
3) Insert the VideoCD
4) Close the CD lid, the VideoCD will start
Your SCPH-5903 will play imports, backups, and VideoCDs. To unlock video mode for PAL 50Hz games on SCPH-5903, install Delta SmartWave as an add-on.
1) Open the CD lid
2) Power on the console
3) Insert the VideoCD
4) Close the CD lid, the VideoCD will start
Your SCPH-5903 will play imports, backups, and VideoCDs. To unlock video mode for PAL 50Hz games on SCPH-5903, install Delta SmartWave as an add-on.
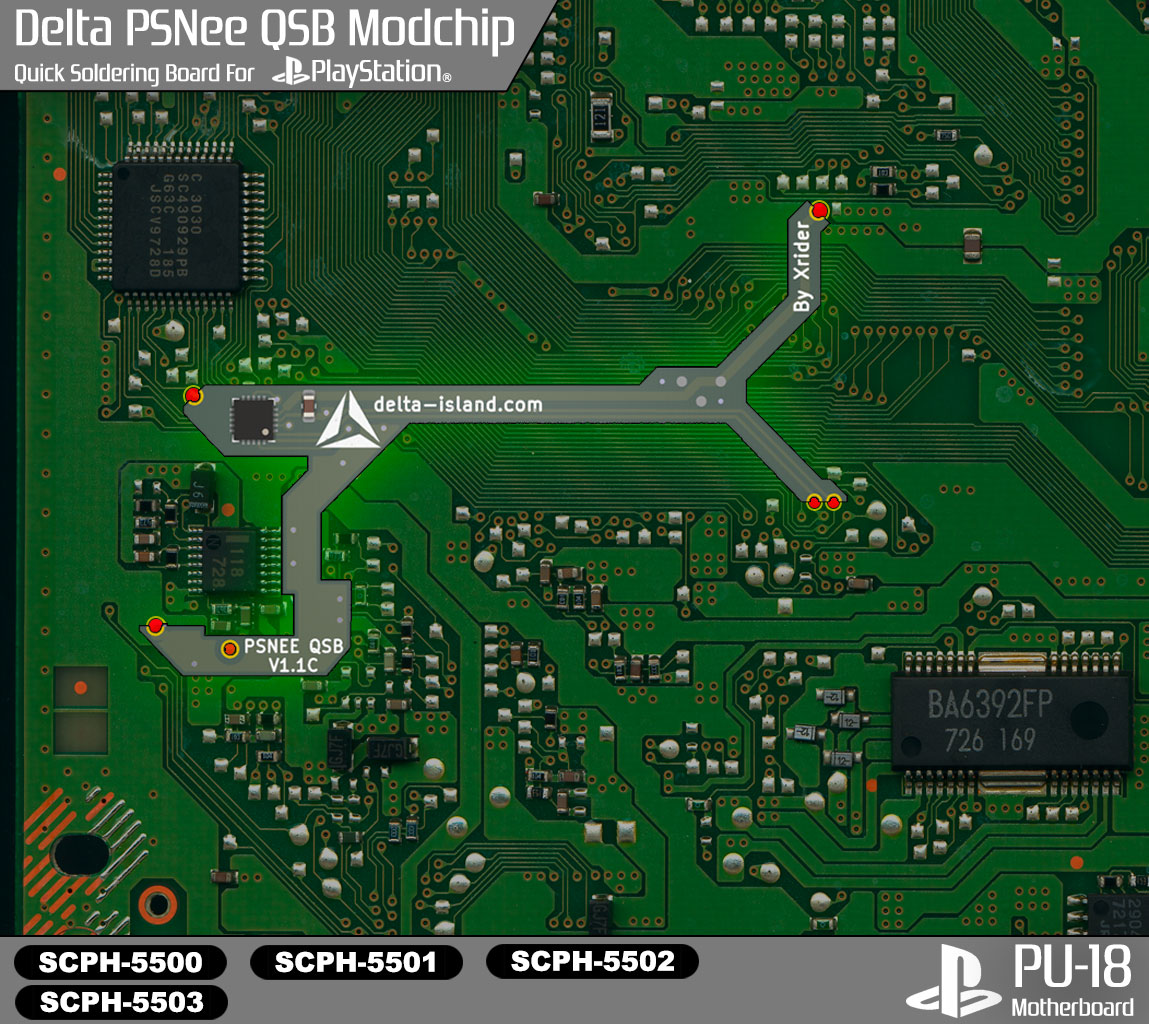
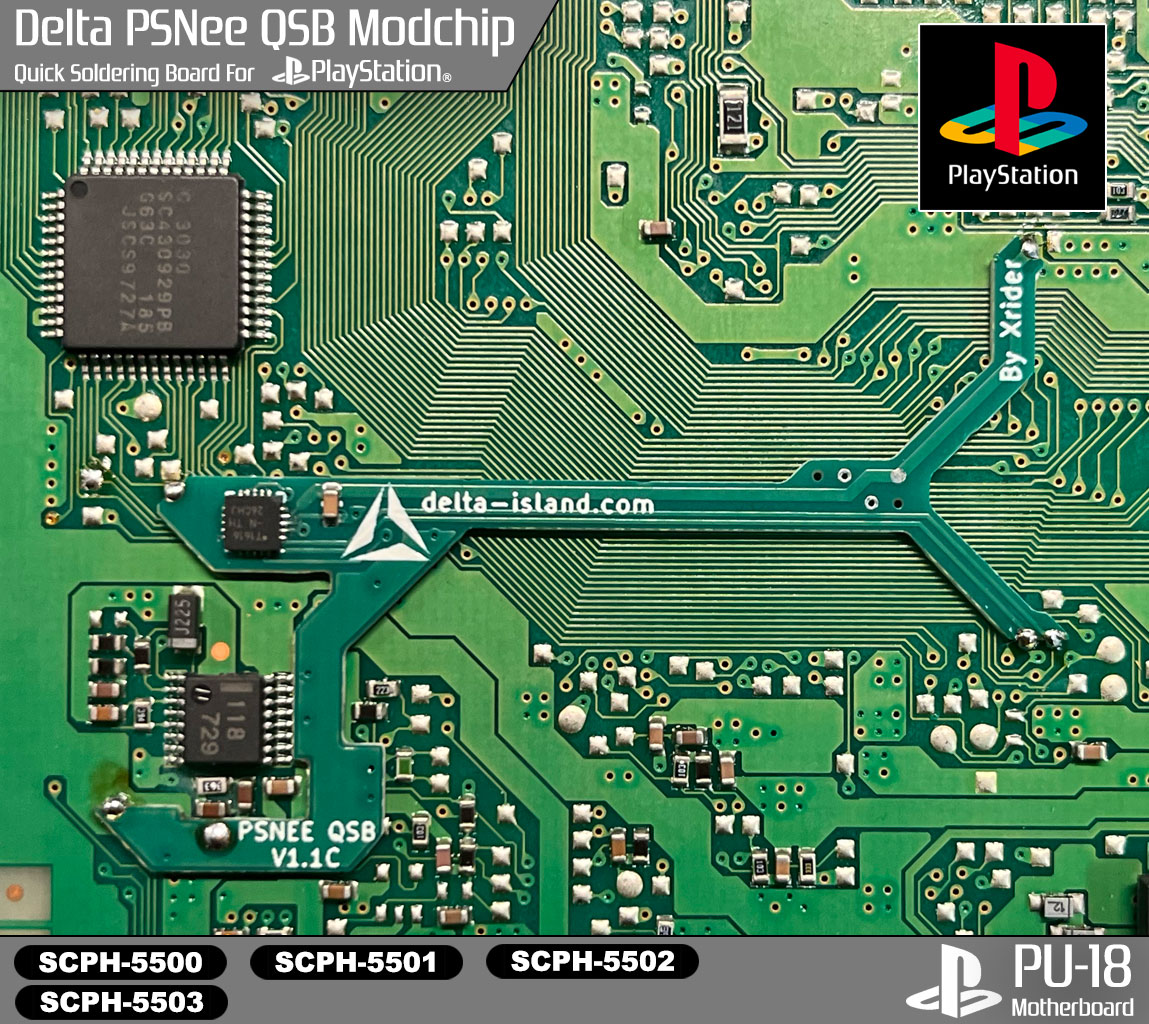
PU-18 motherboard
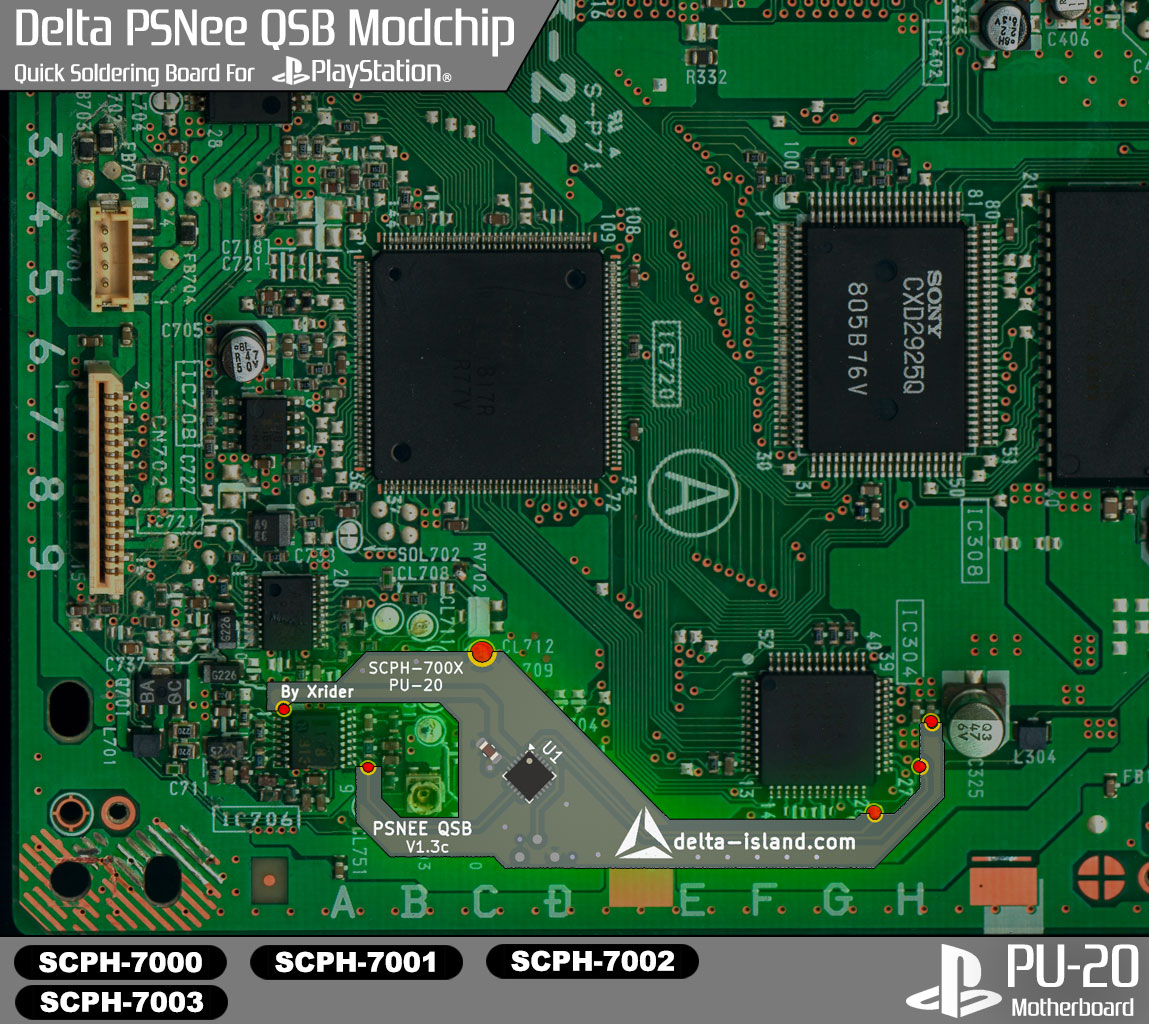
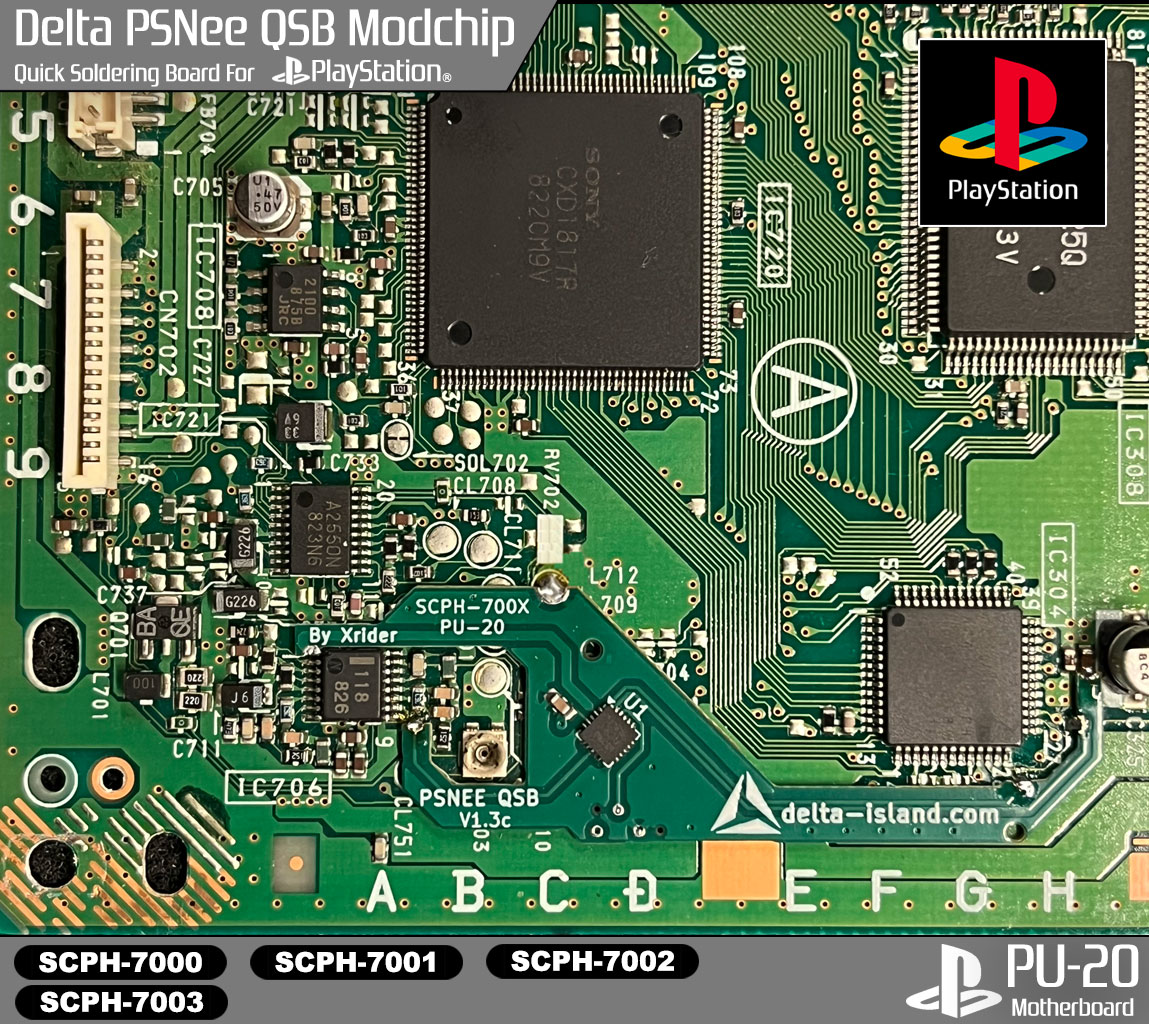
PU-20 motherboard
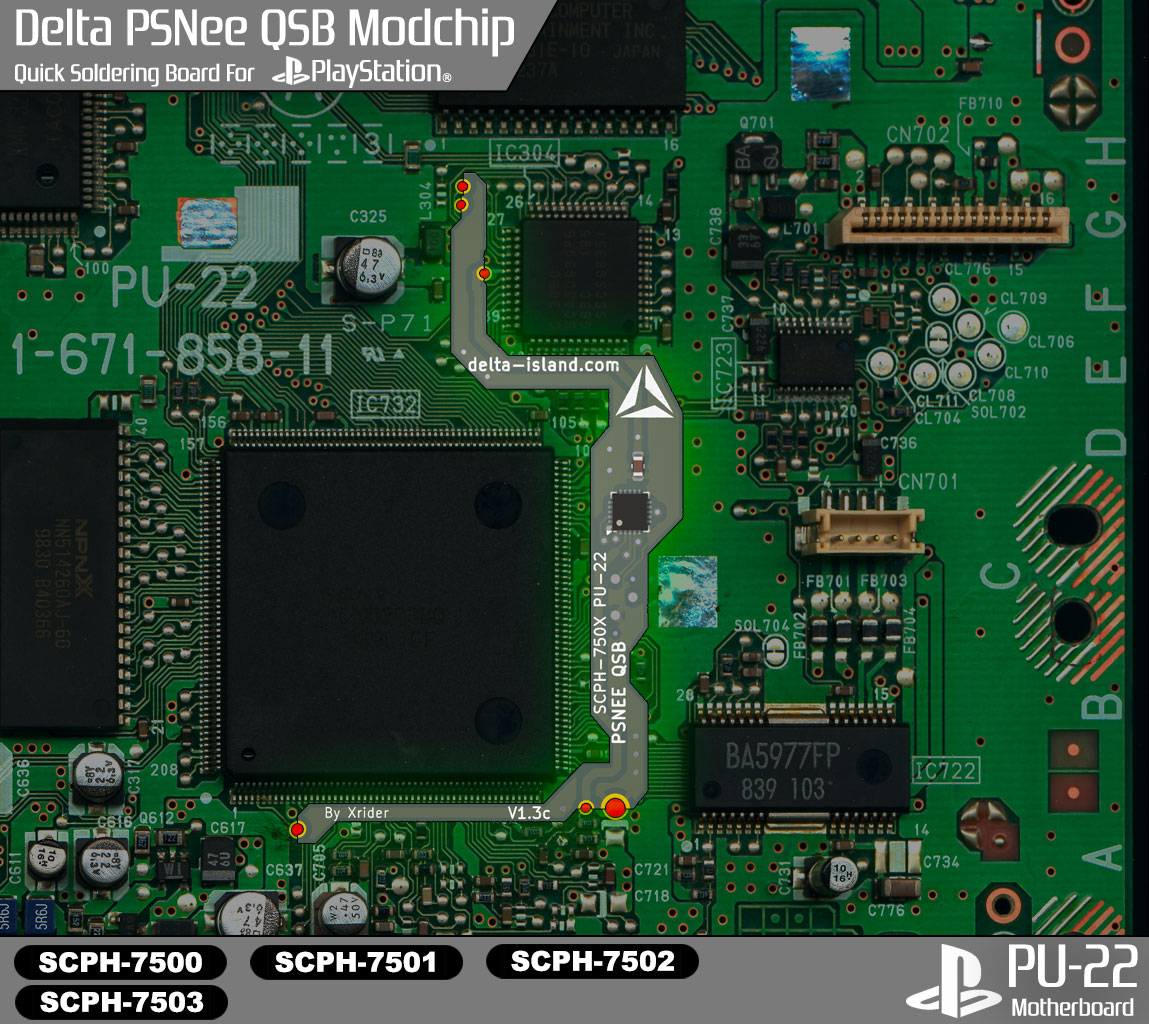
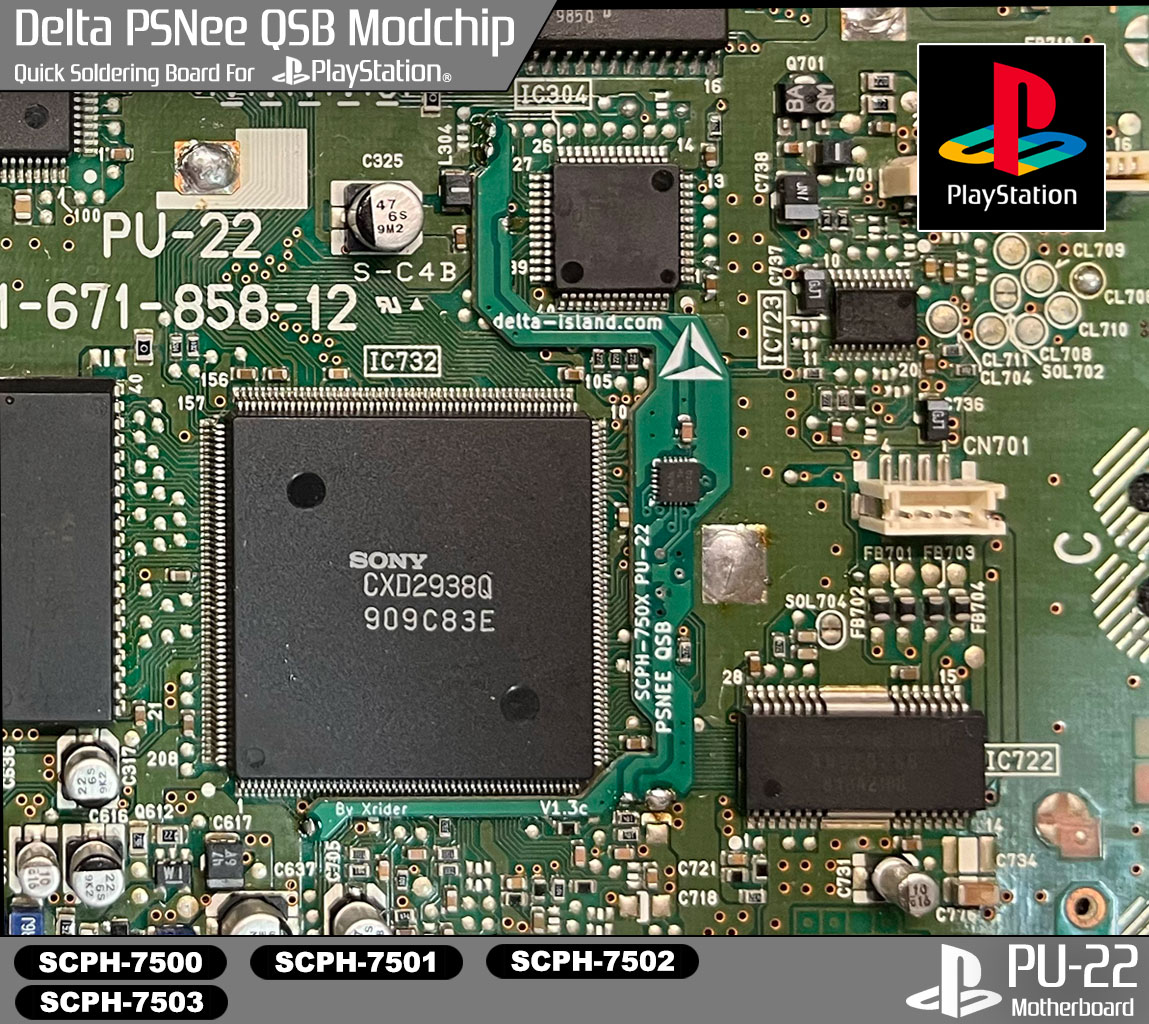
PU-22 motherboard
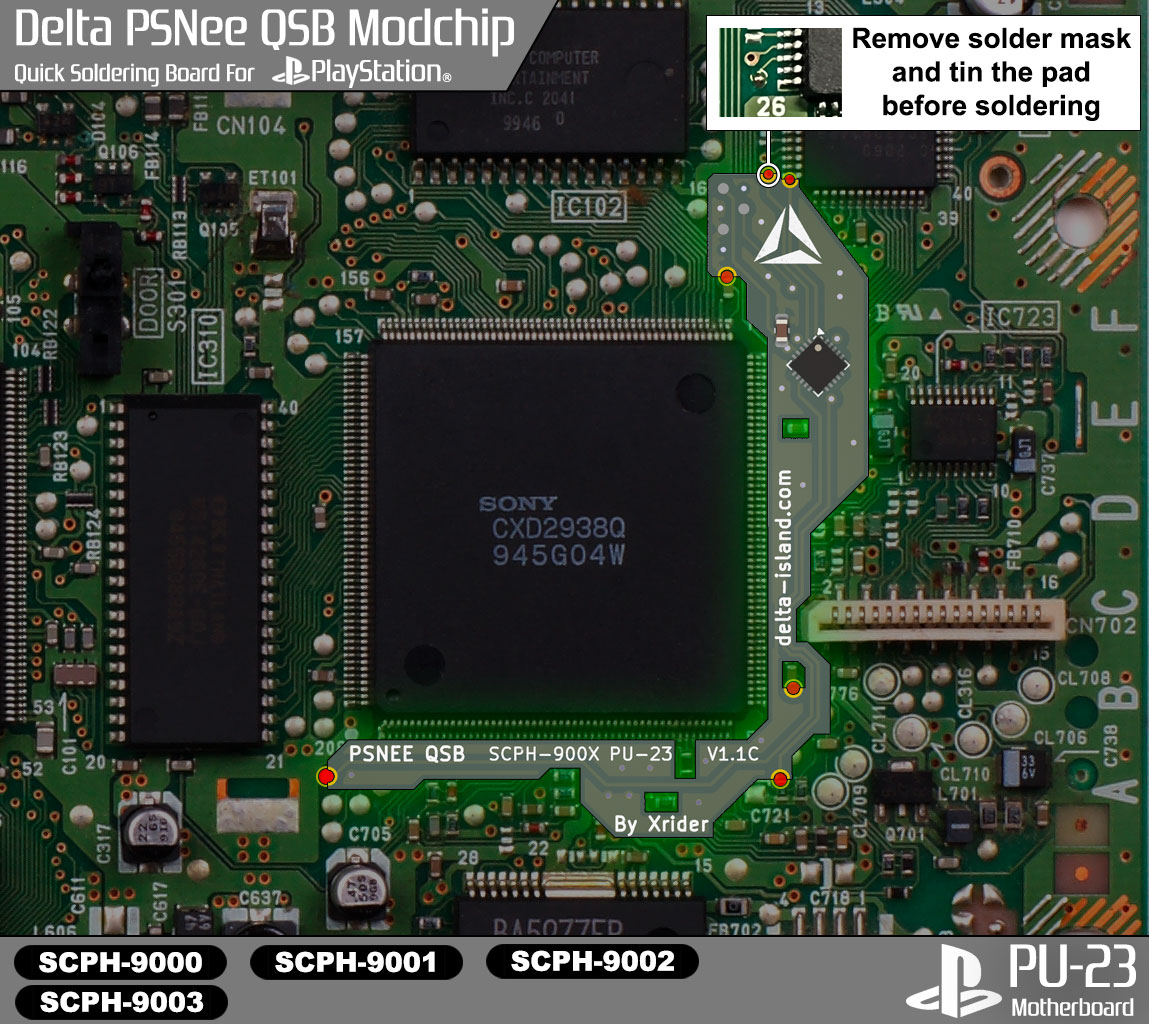
PU-23 motherboard
Top pad must be prepared
Important: the top pad must be scraped and then tinned before installing the Delta PSNee QSB.

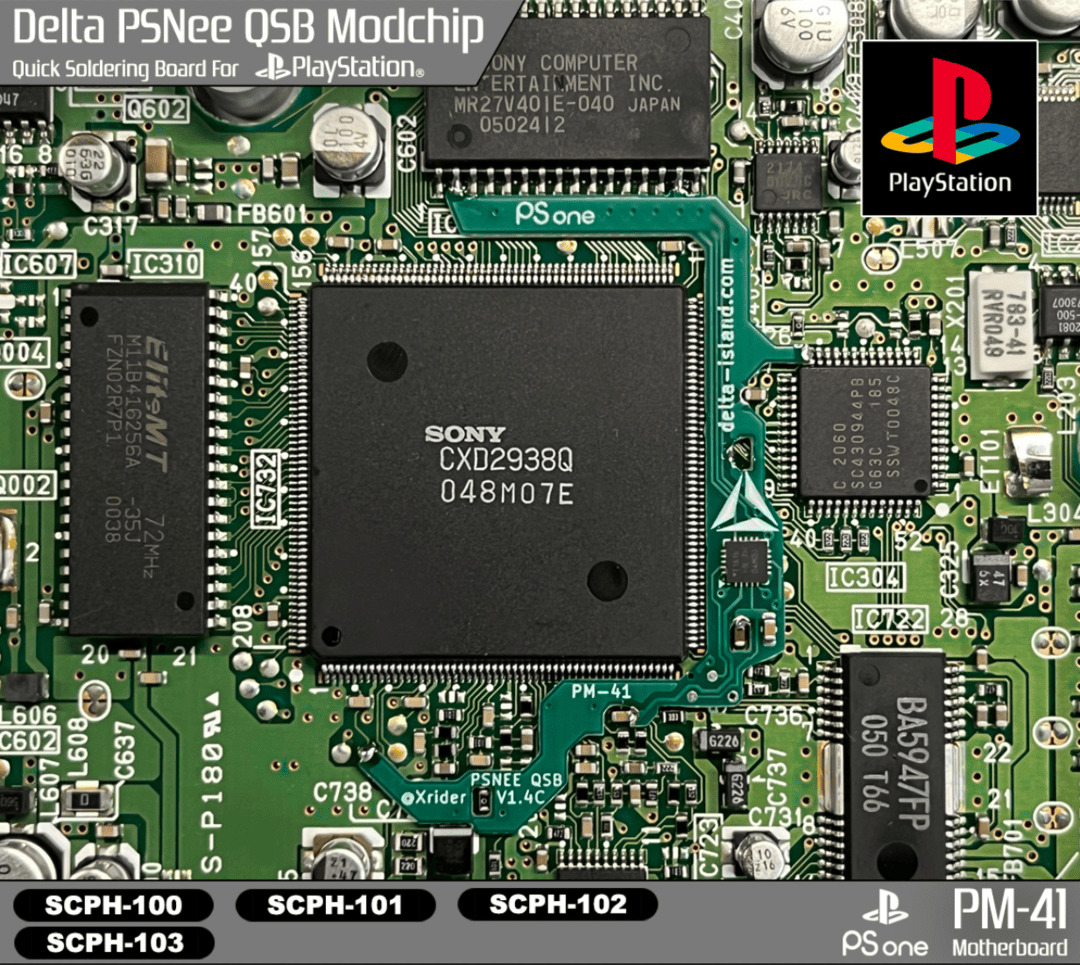
PM-41 motherboard (PSone)
Pad must be scraped/tinned
Important: the indicated pad must be scraped and then tinned before installing the Delta PSNee QSB.

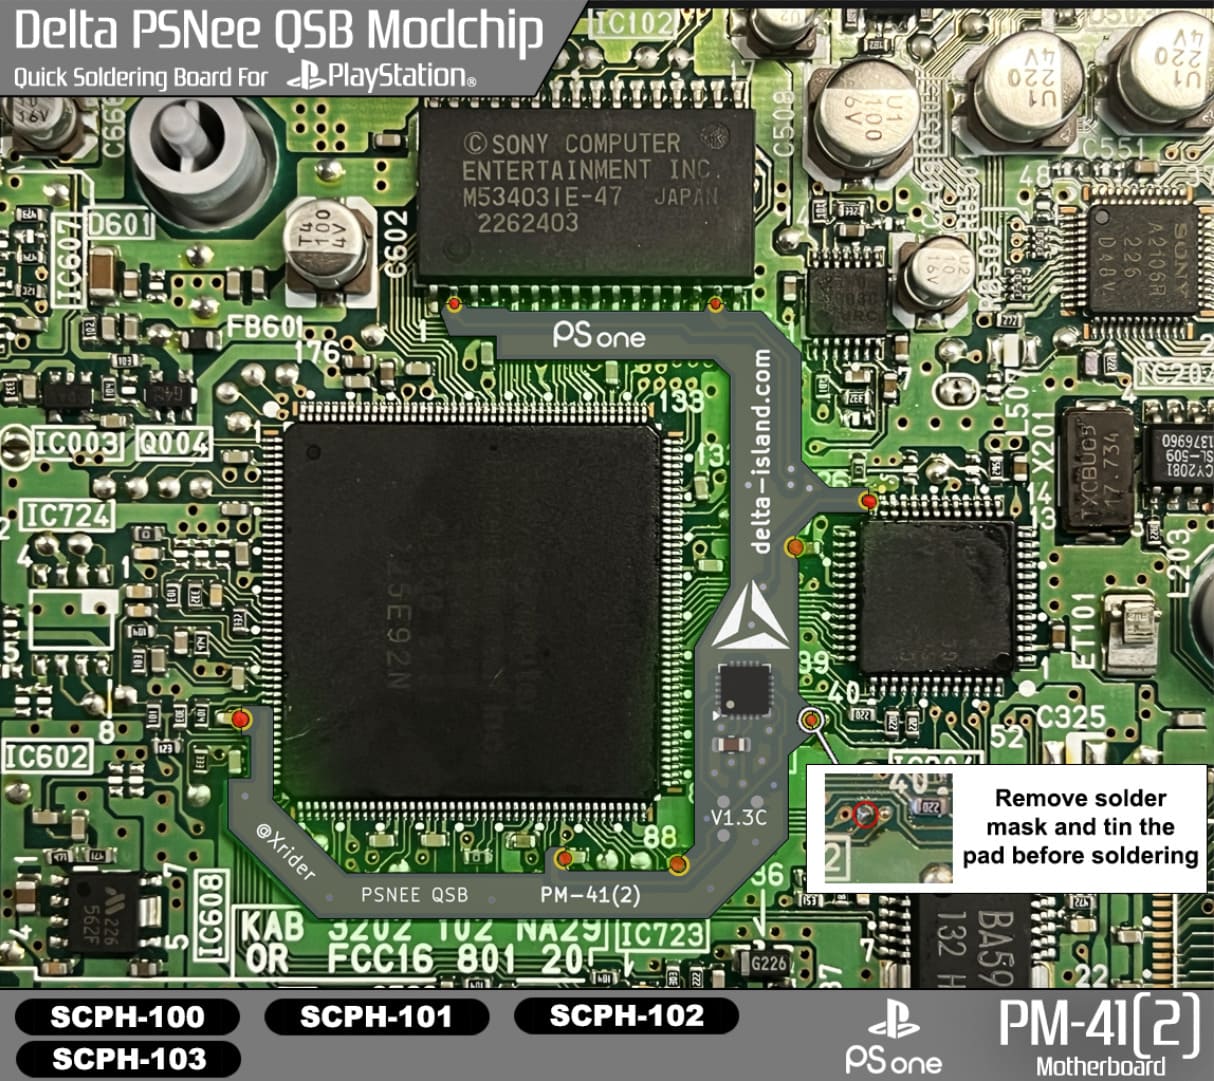
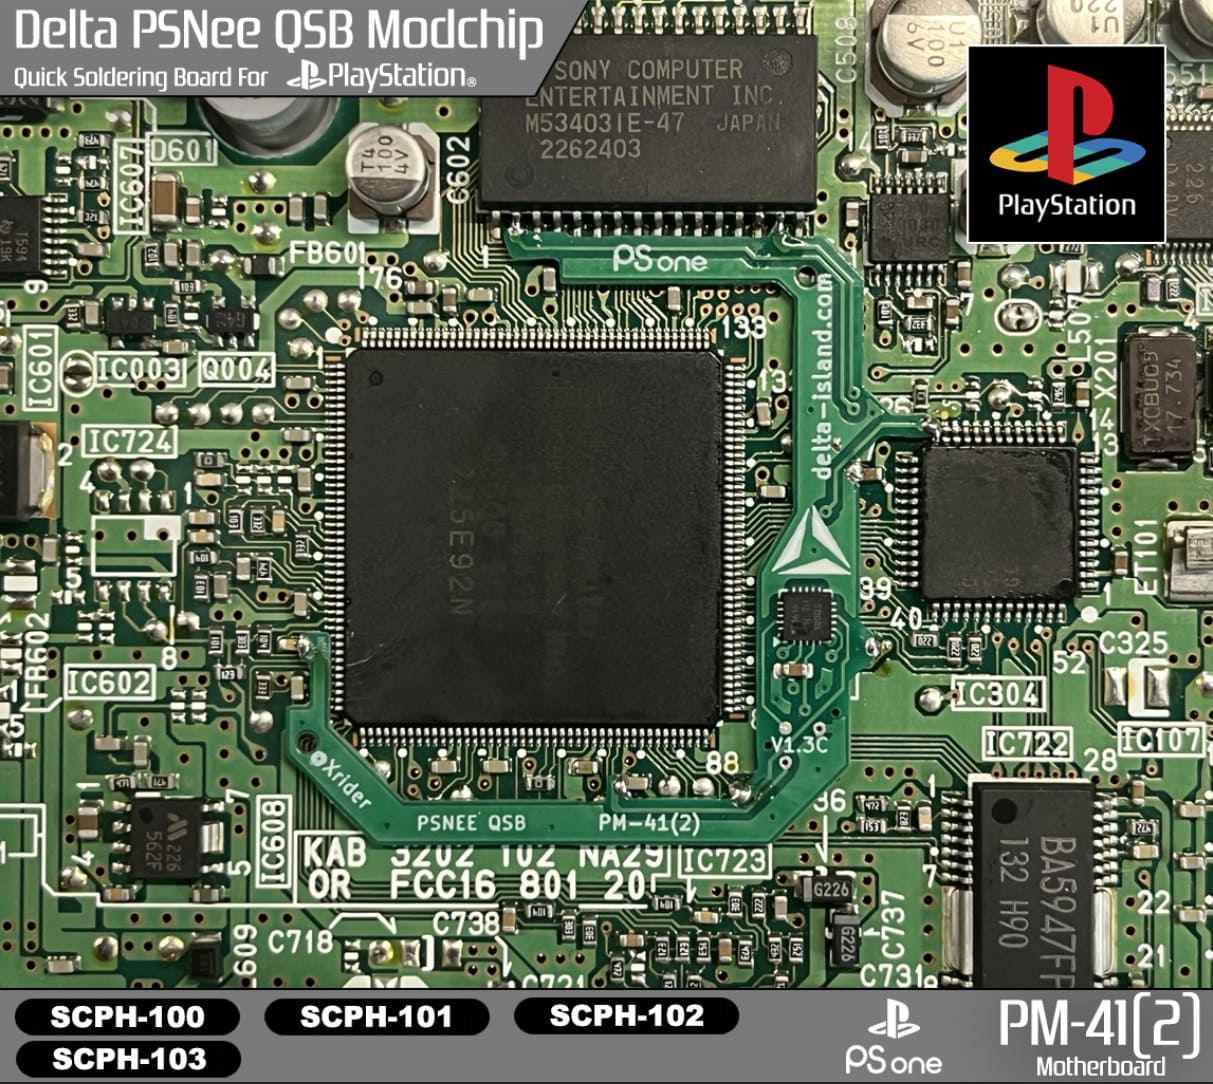
PM-41(2) motherboard (PSone)
Pad must be scraped/tinned
Important: the indicated pad must be scraped and then tinned before installing the Delta PSNee QSB.
📊 5 - Comparison table: PlayStation modchips
🚀 Ready to mod your PlayStation cleanly?
The Delta PSNee QSB is the ideal solution for a fast, stealthy, and reliable installation, with full coverage of PS1 / PSone motherboards.